![Bourbon Vanilla Crème Brûlée [dairy-free option]](https://images.squarespace-cdn.com/content/v1/5cae4a324d87112fb4f0c0c7/1613182854847-WHBKW6XN51D03F4LR99L/Photo+Oct+17%2C+4+01+05+PM.jpg)
Bourbon Vanilla Crème Brûlée [dairy-free option]
With only six ingredients and this step-by-step guide, you too can make crème brûlée in your home kitchen — no torch or special equipment required! This Bourbon Vanilla Crème Brûlée is a fun twist on the classic that’s just the right balance creamy and boozy, with that glass-like sugar crust that we all love. And to top it off — this recipe can easily be made dairy-free! Jump to recipe.

It’s no secret that this silky smooth, luscious custard topped with crunchy caramel is the absolute dreamiest dessert. Maybe that’s why restaurants can charge $10-$12 for a dollar’s worth of ingredients? There’s something about crème brûlée that feels inherently complicated. After all, it must be difficult to achieve the perfect creamy custard and sugary crust — right? Nope!
Crème brûlée really is one of the simplest desserts to make at home. There’s minimal ingredients, no constant stovetop stirring, and no specialty tools needed. It’s as simple as mixing up a few egg yolks with sugar, warm cream, and a little vanilla. Bake, then chill and broil with sugar on top. You’ve got this, friend.
A couple notes for the home chef before getting started:
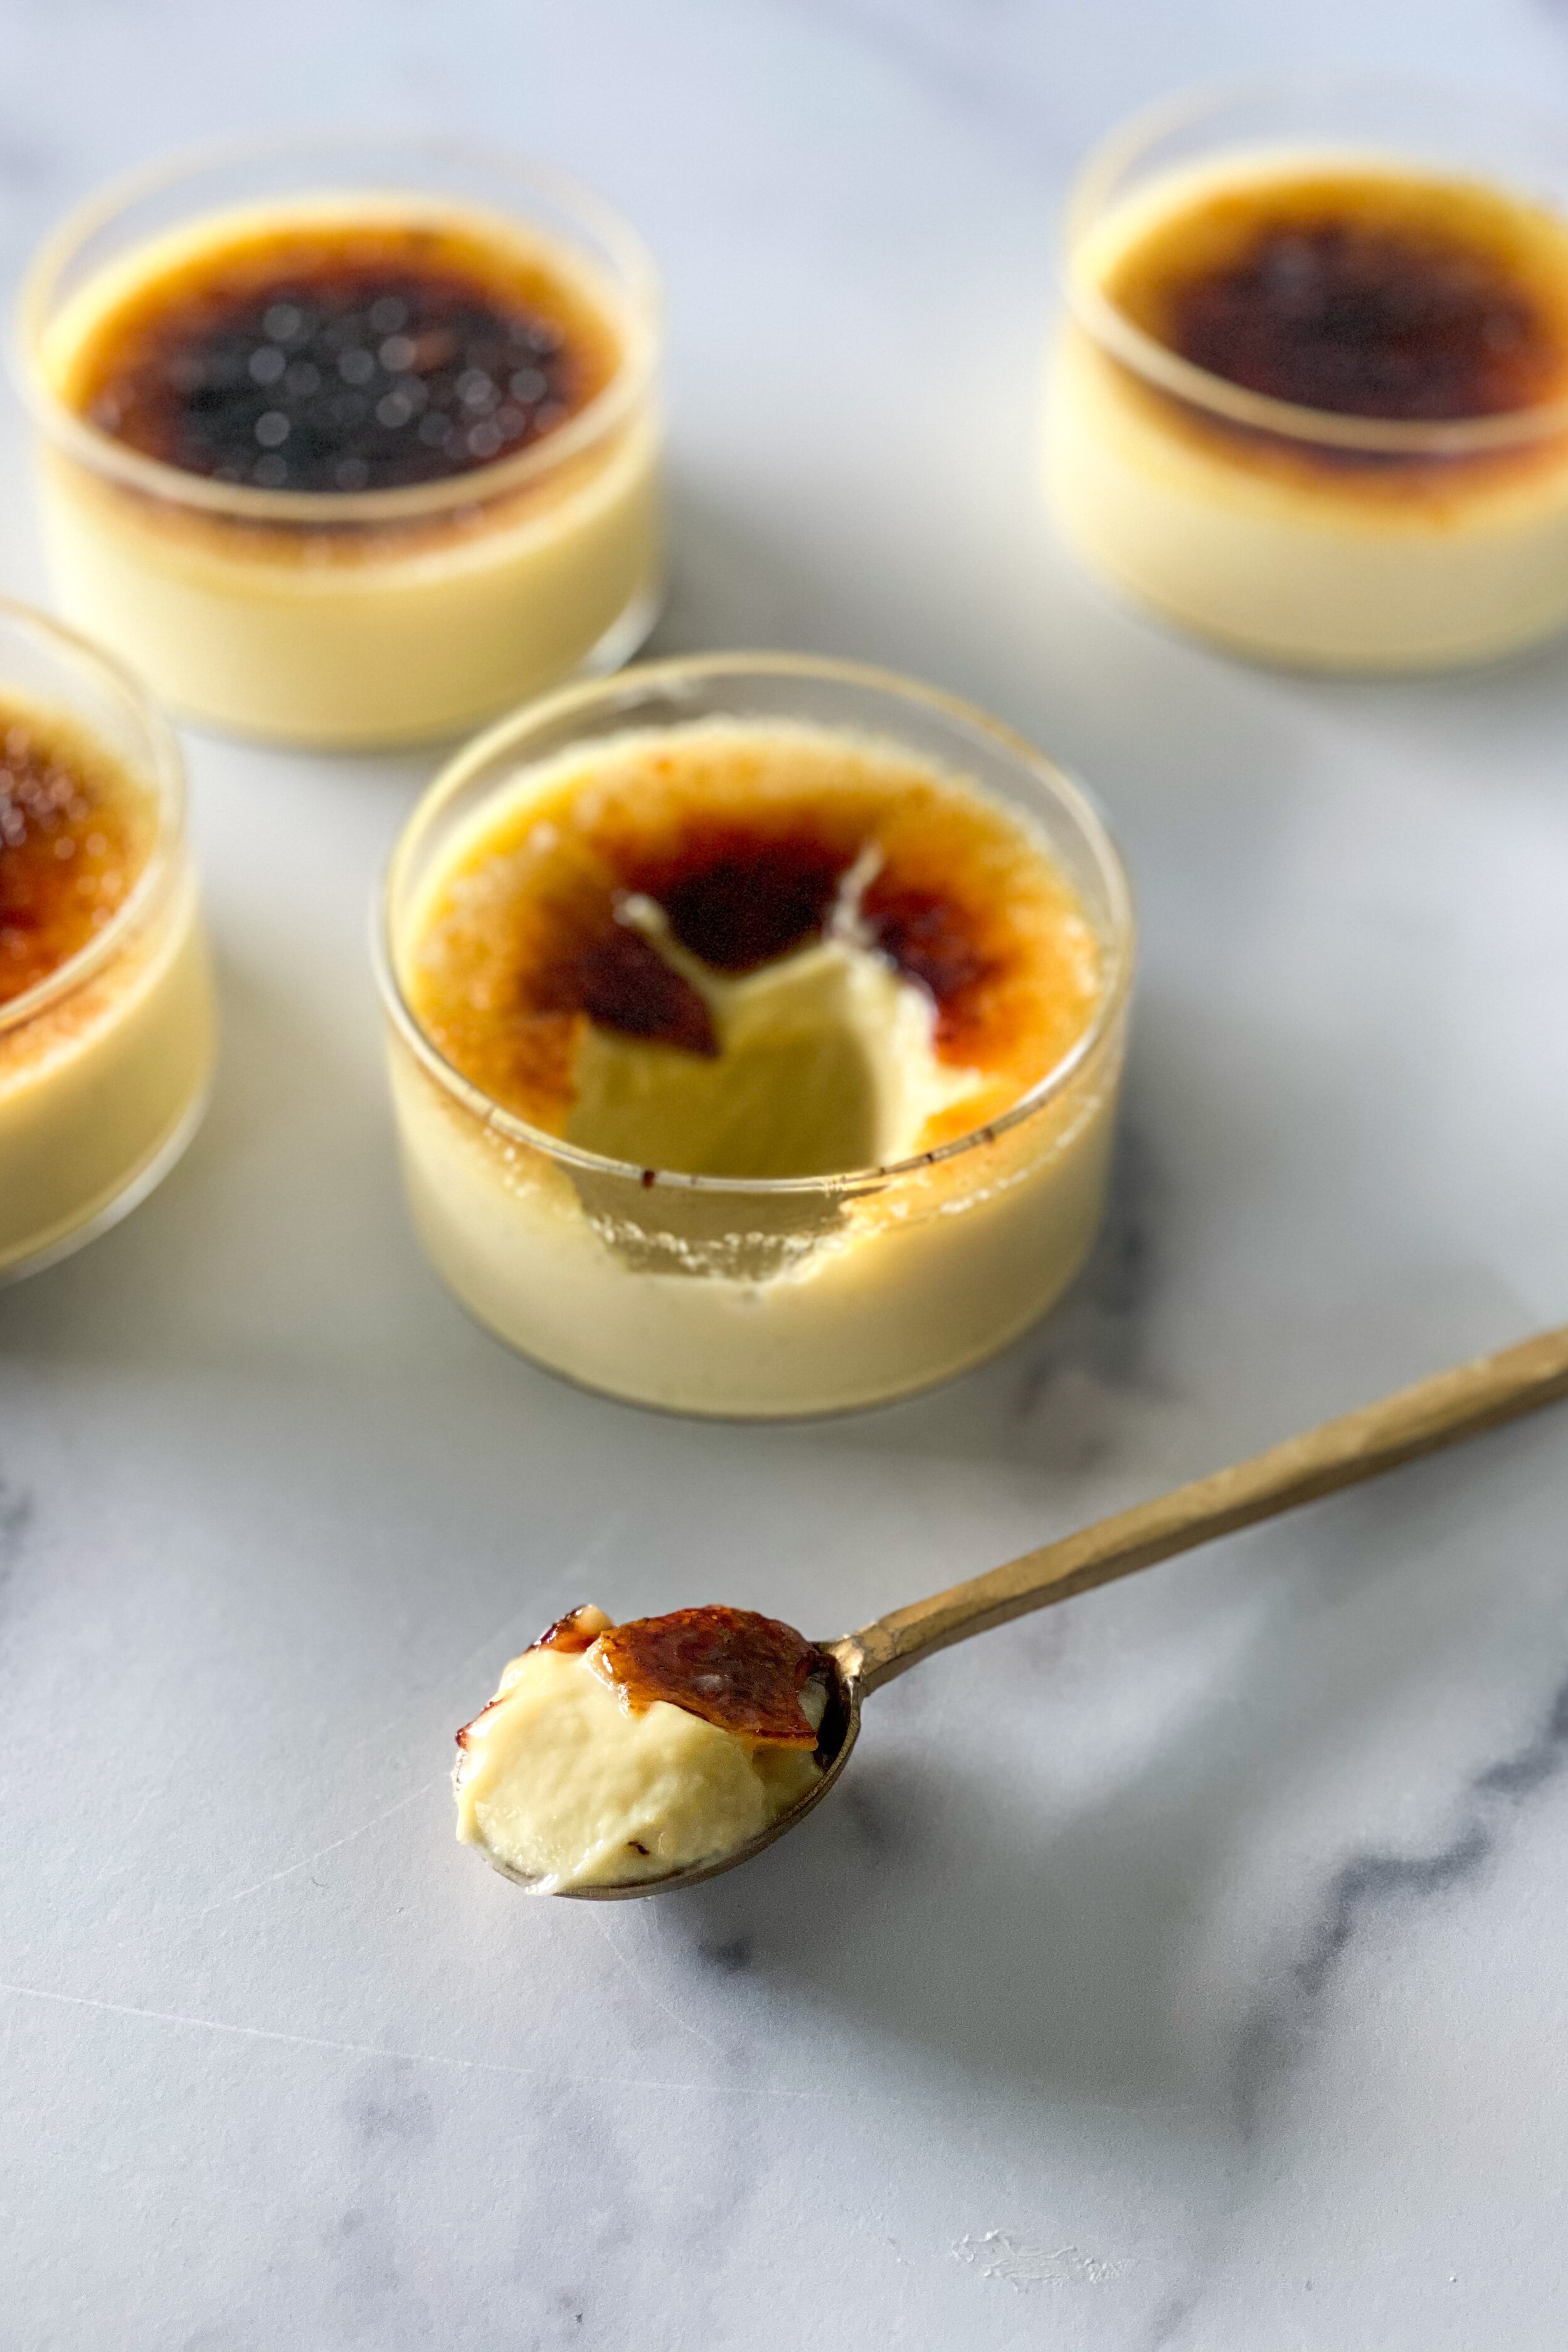
Creme brûlée takes less than an hour to bake, but will need to chill for at least an hour before being brûléed. Ideally, chill for 4 hours prior to serving.
The custard will firm up considerably in the refrigerator, so take it out of the oven when the center is barely set. It should be jiggly but not liquid-y.
Step-by Step: how to make crème brûlée at home
Make the custard filling: The custard filling is a three part process process. First, you’ll gently warm the heavy cream [or coconut milk if you’re going for the dairy-free version] with the split vanilla bean until the mixture starts to steam and bubble around the edges. Set the mixture aside and let it steep while you prepare the rest of the custard. Second, you’ll beat egg yolks and sugar until light in color — about a minute — and whisk in the bourbon. Lastly, you’ll pour about 1/4 of the cream mixture into the eggs + sugar and whisk. Then slowly pour in the rest of the cream mixture, whisking as you pour.
Strain your custard: After you finish the custard filling, strain the mixture through a fine-mesh sieve into a large glass measuring cup with a pour spout. The pour spout will make filling the ramekins much easier!
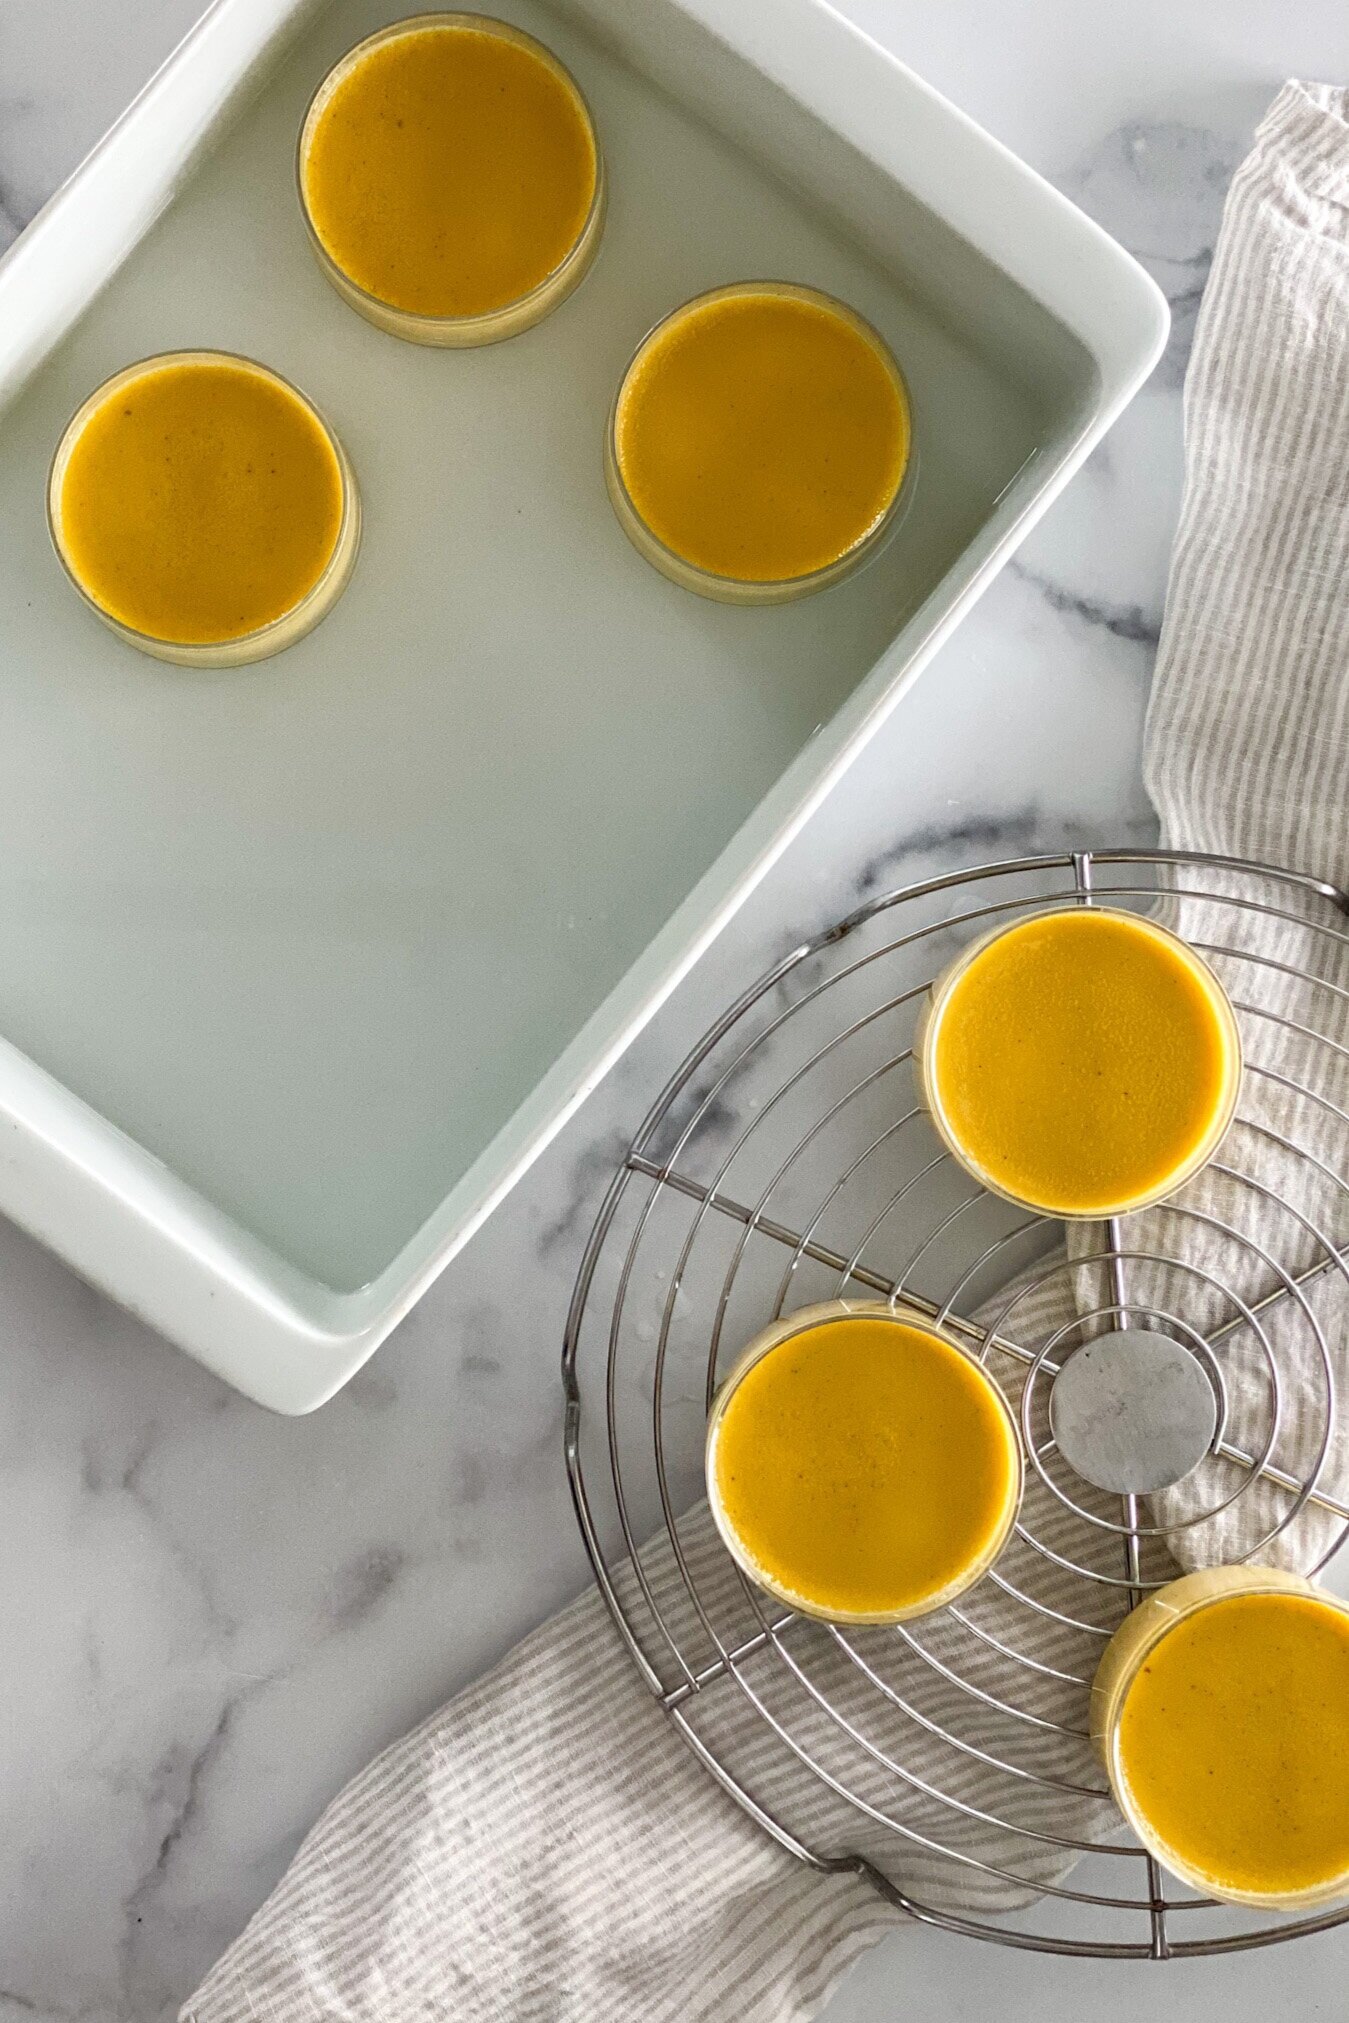
Gently bake the custard in a water bath: Heat a kettle of water while you preheat the oven. Then place the filled ramekins in a baking or roasting pan and fill the pan with the warm water carefully, as not to splash water into the ramekins.
Chill the custard before you brûlée + serve: Once baked, chill the custards for 3-4 hours. The baked and set custard must be chilled before caramelizing the sugar on top to ensure the perfect texture.
Brûléeing + serving: You can definitely use a torch to caramelize the sugar on top of the custard, I picked up this one from my local hardware store, but it’s definitely not needed. If you don’t have use for a torch, the oven broiler does a wonderful job! I recommend putting the ramekins in a cold oven, then turning on the broiler. This helps keep the custard cool while getting the top crisp.

The moral of the story? Don’t shy away from making some gorgeous creme brûlée at home. This Bourbon Vanilla Creme Brûlée is one of my favorite ultra-fancy desserts that always impresses and are so easy to make ahead. Hellooooooo easy entertaining! Plus — whisking egg yolks and sugar, tempering the mixture with warm cream or coconut milk is seriously as romantic as is sounds.
Bourbon Vanilla Crème Brûlée
With only six ingredients and this step-by-step guide, you too can make crème brûlée in your home kitchen — no torch or special equipment required! This Bourbon Vanilla Crème Brûlée is a fun twist on the classic that has just the right balance of boozy and creamy, with that glass-like sugar crust that we all love. And to top it off — this recipe can easily be made dairy-free!
INGREDIENTS:
- 2 cups heavy cream or full fat coconut milk
- 1 vanilla bean, split lengthwise, or 1 teaspoon vanilla extract
- 1/8 teaspoon salt
- 5 egg yolks
- 2 tablespoons bourbon
- 1/2 cup sugar, plus 4 teaspoons for topping
INSTRUCTIONS:
Preheat oven to 325°F. Place four 6-ounce ramekins in a baking dish. In a saucepan, combine cream, vanilla bean, and salt. Cook over medium heat until mixture is bubbling around the edges and steaming. Set aside to steep for a few minutes.
In a medium bowl, beat egg yolks, sugar, until light. Whisk in the bourbon. Discard vanilla bean from cream mixture. Stir about 1/2 cup of the cream into the egg yolk mixture. Gradually whisk in remaining cream.
Strain mixture with a fine mesh sieve into a large measuring cup. Pour custard into ramekins, dividing equally. Fill baking dish with boiling water until it reaches half way up ramekins.
Bake for 30-50 minutes, or until center is barely set. The cook time here will depend on your oven, convection ovens will take less time than a standard oven. Remove ramekins from water and let cool completely on a wire rack. Cover and refrigerate 4 hours.
When ready to serve, top each custard with about a teaspoon of sugar in a thin layer. Caramelize the sugar with a kitchen torch. If you don't have a kitchen torch, you can caramelize the sugar using your oven. Simply place ramekins in a cold oven 2 to 3 inches from heat source and turn on the broiler. Cook until sugar melts and browns or even blackens a bit, about 5 minutes. Allow the creme brûlée to sit for at least 5 minutes before serving. Serve within two hours of brûléeing.
NOTES:
- Make Ahead: You can make and store in the fridge for up to 4 days ahead. At the last minute, just sprinkle the sugar on top and brûlée as directed above!
Don't forget to tag us @thenorthwestkitchen on Instagram when you make this Bourbon Vanilla Crème Brûlée!

Chocolate Orange Pots de Crème
These Chocolate Orange Pots de Crème are one of my favorite ultra-fancy desserts that always impress a crowd and are so easy to make ahead. Don’t shy away from this gem! It’s simple -- just don’t rush the process. Jump to recipe.

When I put out my first dessert menu as a pastry chef -- these little beauties were the first thing I dreamed up and from that day forward -- I wasn't allowed to take them off the menu without a detailed explanation of why and an exact date when they'd return to all of our patrons.
The idea came to me one day when I was reminiscing over noshing on Terry's Chocolate Oranges during the holidays with my family over the years. They are a delicious combination of chocolate with a hint of orange oil and as if they couldn’t get any better, they came in “segments”, shaped just like a real orange [which for 7-year-old Cassie was the stuff of dreams]. The tradition in our family was to open one on Christmas Eve -- my brother would always volunteer to hit the top and the chocolate orange ball would fall into sections for all of us to enjoy.

Chocolate + Orange have a special place in my heart. It feels like Christmas. Like family. ⠀
This recipe is for my SERIOUS chocolate-lovers. Chocolate Pot de Crème is super-rich, decadent French take on chocolate pudding that will make you feel like a culinary boss at any holiday gathering. This dairy-free version is a mix of full-fat coconut milk, bittersweet chocolate, egg yolks that is scented with orange. Make sure to finish these with some fresh whipped cream, whipped coconut cream, or my favorite -- Coyo Coconut Yogurt.
⠀⠀⠀⠀⠀⠀⠀⠀⠀
Don’t shy away from this gem. It’s simple -- just don’t rush the process. In fact, pots de creme is one of my favorite ultra-fancy desserts that always impress a crowd and are so easy to make ahead. Hellooooooo easy entertaining! Plus — whisking egg yolks and sugar, tempering the mixture with warm coconut milk and chocolate is seriously as romantic as is sounds.

chocolate orange pots de crème
These Chocolate Orange Pots de Crème are one of my favorite ultra-fancy desserts that always impress a crowd and are so easy to make ahead. Don’t shy away from this gem! It’s simple -- just don’t rush the process.
Here’s what you’ll need to make four 4-ounce servings:
INGREDIENTS:
For the pots de crème:
- 9 ounces dark chocolate [at least 70% cacao], finely chopped
- 1 [14-ounces] full-fat coconut milk
- 2 large egg yolks
- ⅛ teaspoon vanila bean paste (about 1/2-1 vanilla bean)
- ⅛ teaspoon kosher salt
- 1 teaspoon gran marnier
- 1 teaspoon finely grated orange peel
- 1 tablespoon maple syrup
For the candied orange peel:
- 1 orange
- 1 cup sugar, divided
- ¾ cup water
For the whipped topping:
- 1 [14-ounce] can full-fat coconut milk, chilled overnight in the refrigerator
- organic sugar, to taste [optional]
INSTRUCTIONS:
For the pots de creme:
- Place the chocolate in a medium bowl and set aside.
- In a medium saucepan, add the can of coconut milk, egg yolks, vanilla bean paste, kosher salt, Gran Marnier, grated orange peel and maple syrup. Whisk until thoroughly combined.
- Heat the mixture over medium-low heat, stirring continually until it thickens and forms a smooth custard that coats the back of a wooden spoon (about 10 to 15 minutes).
- Watch the custard very closely to avoid overcooking it. You want the custard to steam but don't allow it to simmer or boil. Remember: Steaming is good, but simmering and boiling are bad. The custard should be about 175°F [80°C] when it's ready [you don't have to use a thermometer here but it can't hurt!].
- When the custard is ready, take the pot off the heat. Position a fine mesh sieve over the bowl of chocolate, and pour the custard through to catch the orange peel and any lumps that may have formed.
- Let the chocolate and custard mixture sit for 5-6 minutes so the warm custard has time to melt the chocolate completely.
- Gently fold the melted chocolate into the custard base [if you stir too quickly, the chocolate can get grainy].
- Once the mixture is fully combined and smooth, divide evenly into four 4-ounce coffee cups or ramekins and cool to room temperature.
- Cover the cups with foil and chill in fridge for at least 4 hours.
For the candied orange peel:
- Using a vegetable peeler, remove the orange part of peel [avoiding the white pith] from the orange in long strips. Cut the pieces lengthwise into 1/8-inch-wide strips.
- Combine 3/4 cup sugar and 3/4 cup water in a small, heavy saucepan over medium-low heat and stir until sugar dissolves.
- Bring to a boil. Reduce heat and simmer 2 minutes. Add orange peel and simmer for 15 minutes.
- Place remaining 1/4 cup sugar in a small bowl. Using a slotted spoon, remove orange peel strips from the syrup and transfer to the bowl of sugar. Toss to coat. Cool, tossing occasionally. Cover bowl [let the orange peel hang out in the bowl of sugar] and let stand at room temperature overnight. Can be made 2 days ahead -- just make sure to keep them covered!
For the whipped coconut cream:
- When you’re ready to serve, remove the chilled can of coconut milk from the fridge.
- Carefully spoon out the thick layer of solidified coconut cream on the top, avoiding the watery part at the bottom of the can.
- Toss the coconut cream and sugar into a chilled bowl and mix using a hand mixer until fluffy.
- For serving, spoon a generous amount of the whipped coconut cream onto each cup – or if you’re feeling adventurous, some Coyo Coconut Yogurt.
- Top with candied orange peel and wow everyone with your fancy dessert skills!
NOTES:
- This recipes works beautifully every single time -- as long as you don't rush the process! Be patient through each step and you're there!
- If you prefer to stretch this into smaller portions [it's seriously rich so it will definitely work to do so!] you can divide the chocoalte custard among eight 2-ounce ramekins or espresso cups.
- If you tolerate dairy just fine you can replace the whipped coconut cream with fresh whipped cream.
Don't forget to tag us @thenorthwestkitchen on Instagram when you make these Chocolate Orange Pots de Crème!
The North + West Kitchen & Cassie Kanable, LLC partner with affiliate platforms including Amazon Services LLC Associates Program where commission may be earned based on clicks and/or purchases, and I would love it if you decided to use the links above! This means if you make a purchase using the links here on the blog – your cost remains the same, but I earn a small percentage to help support this blog. Thank you! Affiliate links help educators like me to fund the free content that we provide.