
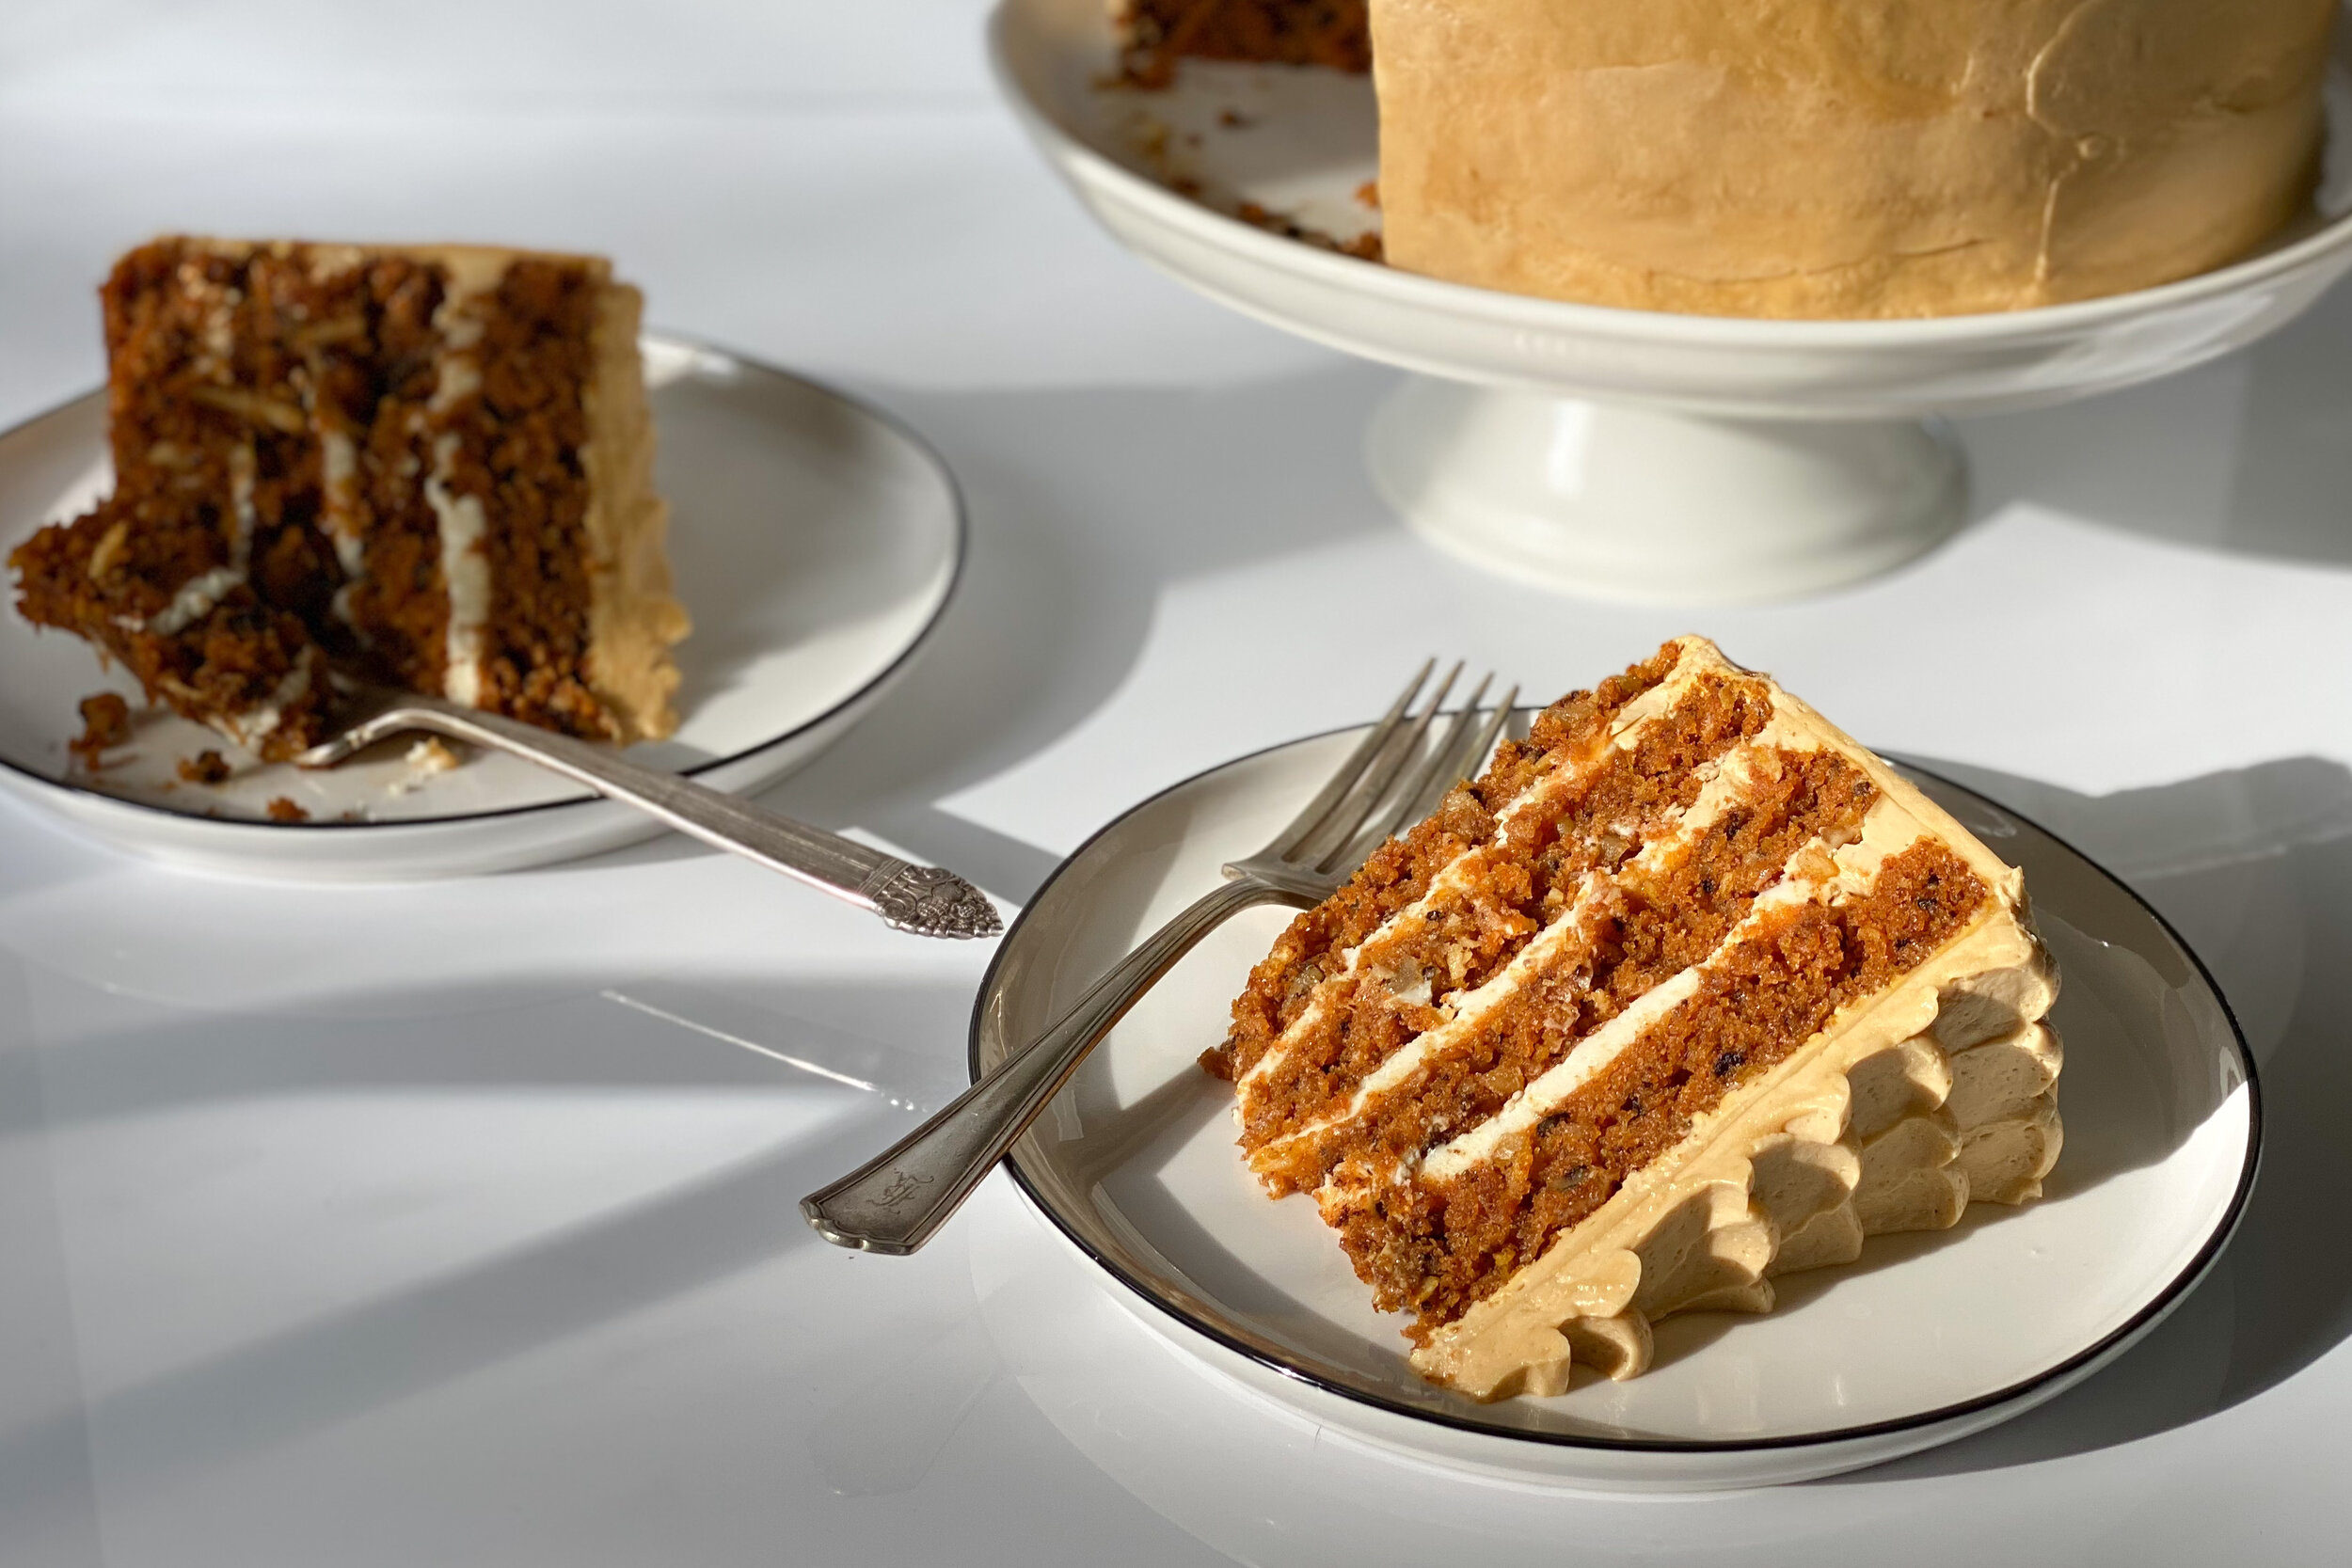
Gluten-Free Carrot Cake with Brown Sugar Buttercream + Goat Cheese Filling
This Gluten-Free Carrot Cake is the perfect dessert for spring! Flavorful + moist carrot cake is studded with chopped walnuts, pineapple, and shredded coconut, filled with a tangy goat cheese filling and slathered in airy brown sugar buttercream [don’t worry — if you’re a cream cheese frosting purist, we’ve got you covered!] Jump to recipe.
This cake is incredibly easy to throw together in one bowl and is made with olive oil rather than butter, which makes it bake up loftier with a more even crumb and stay moist far longer than cakes made with butter. It’s also loaded pureed carrot [not grated!], crushed pineapple, and chopped walnuts, which give it tons of flavor and texture.
And listen, I know my cream cheese frosting purists out there are probably balking at the brown sugar buttercream and goat cheese filling in lieu of the traditional cream cheese frosting, just hear me out: the tanginess from the goat cheese and the airy + slightly sweet brown sugar buttercream make this cake a masterpiece. I developed this recipe for those who can’t really handle cow-dairy without consequences — and the chèvre makes for the perfect tangy substitute for cream cheese.
Still prefer cream cheese frosting? I’ve got you covered. Read on to the recipe below and make up the cream cheese frosting + filling for the classic take on my gluten-free carrot cake.
The best part about taking this cake to any celebration? No one will even notice it’s gluten-free. I serve this cake at Easter each year [it’s required at this point] but this cake can most definitely be served year-round.


BEHIND THE RECIPE
I know every baker under the sun says their carrot cake is the best, so I won’t quite say it, but I will for damn sure be putting my hat in the ring. I originally developed this recipe for my first spring menu at my first pastry chef gig. I remember my boss saying that there was no way carrot cake would sell year-round, so in true Enneagram 8 form, I thought, “challenge accepted.” Once it debuted on the menu, word got out and every review mentioned how incredibly moist + flavorful this cake was without being overly sweet. Isn’t that what everyone wants in a cake? I knew then that I was on to something.
Then the phone started ringing — customers called in asking if we would sell them whole carrot cakes for an upcoming baby shower or birthday. We had coffee shops asking if they could purchase the cake wholesale and serve it by the slice in their pastry case. It became our best-selling dessert and it was, in fact, our best seller year-round. Take that, boss man.
Fast forward many years later and I’ve since adapted that initial recipe to be gluten-free without a single soul knowing it until now. Is it just me or do my fellow gluten-free bakers out there love bringing a dessert to a gathering and watching the shock on people’s faces when they’re told it’s gluten-free? That’s my M.O.


THE SECRET INGREDIENT: PURÉED CARROT
Cooked, puréed carrots are one of the key ingredients that make this cake crazy flavorful and perfectly moist for days. I’m also not a fan of grating anything, so if I can avoid that I’m on board. To save yourself a little time, cook the puréed carrot in advance or better yet, throw them in the Instant Pot:
Carrot purée stovetop method: Simmer 1 pound 4 ounces chopped carrots in a 1- to 2-quart heavy saucepan filled with water, covered, until carrots are very tender, 12 to 14 minutes. Purée carrots in a food processor until smooth.
Carrot purée Instant Pot method: Place a steamer basket in the bottom of the insert and add 1 cup water. Place 1 pound 4 ounces chopped carrots inside the basket and lock the lid in place. Select High Pressure and 4 minutes cook time. Let the pressure release naturally for 10 minutes, then finish with a quick pressure release. Purée carrots in a food processor until smooth.
SOME NOTES FOR THE BAKER BEFORE GETTING STARTED
I know putting together a layer cake can feel a little daunting, but don't worry friend, I got you!
Mise en place — a French term for "everything in its place" — is not just for the pros. As a home cook, mise en place is about having everything you need before you start cooking and it allows you to focus on the task at hand. Take a moment to organize + measure all your ingredients and gather your tools in advance. When it comes to baking + frosting a cake — it’s all about that mise en place.
An offset spatula, parchment paper, and nice serrated knife are well worth the investment.
Chill your cake layers for at least 2 hours before frosting. Do not attempt to spread frosting onto cake layers that are even remotely warm. Without fail, it will make a mess of your cake and leave you frustrated. Better yet, chill your cake layers overnight in the fridge.
If you love baking [or at least, cake-making] like me, consider buying a rotating cake turntable on a pedestal. It’s not essential, but it helps you get that smooth finish quickly and easily. A simple cake carrier will help you transport your cake to the any shindig [I can’t tell you how many times I regretted not having a carrier].
IF YOU PREFER CREAM CHEESE FROSTING:
Instead of preparing the brown sugar buttercream and goat cheese filling, follow these simple steps to make a batch of classic cream cheese frosting:
In a large bowl, cream together 16 ounces softened cream cheese, 6 ounces [1.5 sticks] softened butter, and 2 teaspoons vanilla extract using a hand-mixer on high until well combined, about 2-3 minutes. Add 1 to 1 1/2 cups granulated sugar and continue to mix on high until smooth, about 2-3 minutes. [if you prefer your cream cheese frosting to be a bit sweeter, add a bit more granulated sugar to taste. [we like it tangy!]. Once cake layers have cooled, fill and frost as desired!

Gluten-Free Carrot Cake with Brown Sugar Buttercream and Goat Cheese Filling
This Gluten-Free Carrot Cake is the perfect dessert for spring! Flavorful + moist carrot cake is studded with chopped walnuts, pineapple, and shredded coconut, filled with a tangle goat cheese filling and slathered in airy brown sugar buttercream.
INGREDIENTS:
For the carrot cake:
- 3 cups Bob's Redmill Gluten Free 1-to-1 Baking Flour (if using another brand of gf flour, see note below)
- 2 1/2 cups granulated sugar
- 1 teaspoon sea salt
- 1 tablespoon baking soda
- 1 tablespoon ground cinnamon
- 1 1/2 cups olive oil
- 4 large eggs, lightly beaten
- 1 tablespoon vanilla extract
- 1 1/2 cups walnuts, finely chopped
- 1 1/4 cup shredded unsweetened coconut
- 1 1/2 cups pureed cooked carrots (about 1lb 4oz raw carrots)
- 8 oz. can crushed pineapple, drained
For the goat cheese filling:
- 12 oz chèvre (soft goat cheese), room temperature
- 6 tablespoons unsalted butter, room temperature
- 1 teaspoon vanilla extract
- 1 cup granulated sugar
For the brown sugar swiss meringue buttercream:
- 1 2/3 cups light brown sugar
- 1/4 tsp kosher salt
- 6 large egg whites
- 16 ounces unsalted butter, room temperature
INSTRUCTIONS:
For the cake layers:
Preheat oven to 350°F (180°C). Position rack in center of oven. If you're opting for four layers (as pictured), you'll need four 9-inch pans or make two layers at a time. For two layers, you'll need two 9-inch cake pans. Prepare cake pans with avocado oil and line the bottom with a parchment round.
Peel and cook carrots until a fork tender (see Instant Pot or stovetop method above). 1lb 4oz raw carrots should yield about the right amount of puréed, cooked carrots. Drain the carrots and purree while still warm in a blender or food processor until they are smooth. Measure out 1 1/2 cups of the carrot purée and set aside.
In a large bowl, combine flour, sugar, baking soda, salt, and cinnamon. Whisk gently to combine.
Add olive oil, eggs, and vanilla and whisk well to combine. Fold in the coconut, walnuts, crushed pineapple, and warm carrot purée.
Divide batter evenly among prepared pans and Bake 25 to 30 minutes if you're making a 4-layer cake (45-50 minutes if you're making a 2-layer cake) rotating pans if necessary, until a toothpick inserted into the center of each cake comes out clean. Let cool in pans set on a cooling rack for 15 minutes, then turn out onto a rack to finish cooling completely.
For the goat cheese filling:
In a large bowl, cream together softened goat cheese and butter using a hand-mixer on high until well combined, about 2-3 minutes.
Add granulated sugar and continue to mix on high until smooth, about 2-3 minutes.
For the swiss meringue buttercream:
- Whisk brown sugar, egg whites, and salt in the heatproof mixing bowl of your stand mixer. Place over a pot of simmering water and whisk constantly until sugar is completely dissolved, 2 to 3 minutes. Test by rubbing some of the egg white mixture between your fingers -- if you don't feel any sugar granules, it's ready! Remove from heat.
- With an electric stand mixer fitted with the whisk attachment, whisk on high speed until cool (test by touching the bottom of the bowl), about 7 to 10 minutes.
- Switch to the paddle attachment. With mixer on medium-high speed, add softened butter, 2 tablespoons at a time, until combined.
Assembly:
- Place one layer of cake on a cake stand or serving plate with cardboard cake round (make sure cake layers are completely cooled).
- Pipe a 1 inch border of buttercream around the outside to hold the goat cheese filling in. Fill with about 1/3 of the goat cheese filling. Repeat with each layer until you reach the final layer.
- Place final layer on top and do a thin crumb coat on the cake. Chill for 20mins.
- Frost the top and sides of the cake. Smooth with a large offset spatula or icing scraper.
- Optional: Pipe a petal pattern over the top using a 1A piping tip with remainder of frosting. Starting from the top, outside edge of the cake, pipe a border of single dots, about 1/2-inch or so, of the brown sugar buttercream. Use a small offset spatula to press and pull the dot towards the center of the cake (scraping excess buttercream off the spatula as you go). To start a new row, pipe the next dot overlapping the previous pulled dot. This motion is what creates a petal effect. Repeat the process until you have reach the center of the cake.
*NOTES:
- If you're using an alternative brand of gluten free flour, make sure it contains xanthan gum. If not, add 1 tsp xanthan to the recipe
- Chill your cake layers for at least 2 hours at room temperature or 1 hour in the freezer before frosting. Do not attempt to spread frosting onto cake layers that are even remotely warm. Without fail, it will make a mess of your cake and leave you frustrated. Better yet, chill your cake layers overnight in the fridge or even in the freezer.
- Troubleshooting with the buttercream: If the buttercream (or your kitchen) seems too warm, stick the bowl in the fridge for a few minutes, then continue beating. If it's too cold, let the frosting warm up to room temperature, then continue beating until it comes together. This can take several minutes, so don't give up!
Don't forget to tag us @thenorthwestkitchen on Instagram when you make this Gluten-Free Carrot Cake!
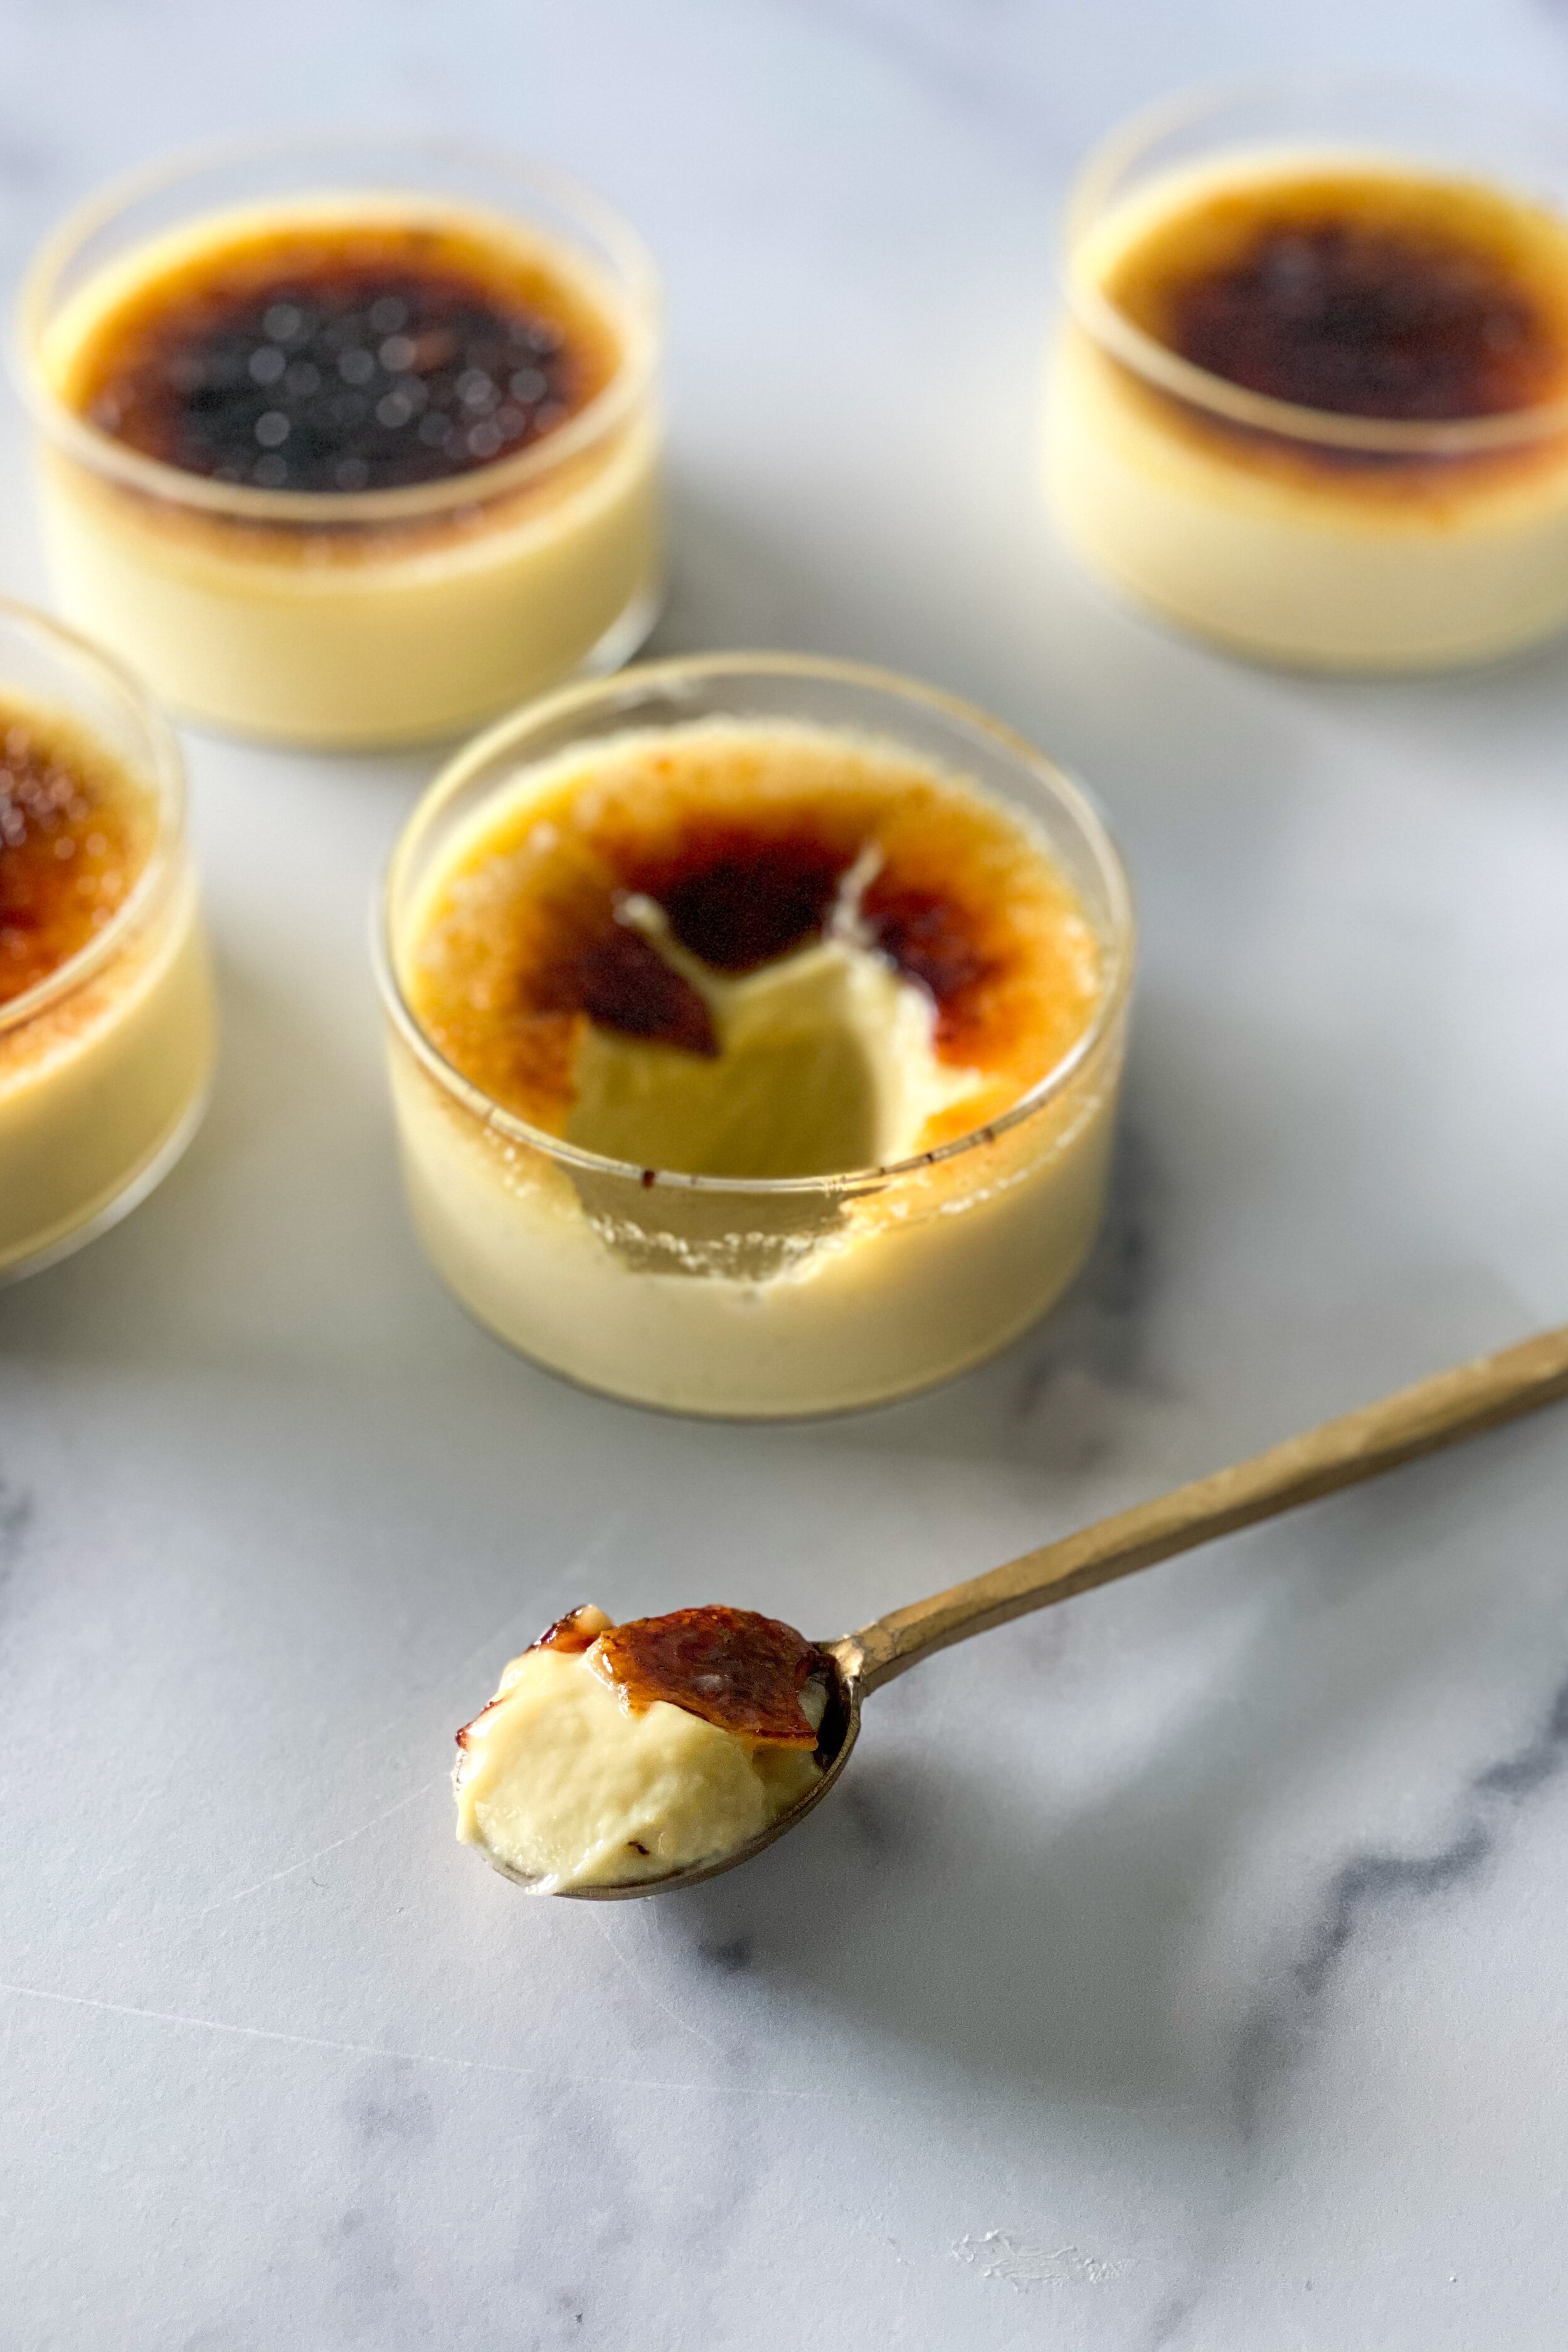
![Bourbon Vanilla Crème Brûlée [dairy-free option]](https://images.squarespace-cdn.com/content/v1/5cae4a324d87112fb4f0c0c7/1613182854847-WHBKW6XN51D03F4LR99L/Photo+Oct+17%2C+4+01+05+PM.jpg)
Bourbon Vanilla Crème Brûlée [dairy-free option]
With only six ingredients and this step-by-step guide, you too can make crème brûlée in your home kitchen — no torch or special equipment required! This Bourbon Vanilla Crème Brûlée is a fun twist on the classic that’s just the right balance creamy and boozy, with that glass-like sugar crust that we all love. And to top it off — this recipe can easily be made dairy-free! Jump to recipe.

It’s no secret that this silky smooth, luscious custard topped with crunchy caramel is the absolute dreamiest dessert. Maybe that’s why restaurants can charge $10-$12 for a dollar’s worth of ingredients? There’s something about crème brûlée that feels inherently complicated. After all, it must be difficult to achieve the perfect creamy custard and sugary crust — right? Nope!
Crème brûlée really is one of the simplest desserts to make at home. There’s minimal ingredients, no constant stovetop stirring, and no specialty tools needed. It’s as simple as mixing up a few egg yolks with sugar, warm cream, and a little vanilla. Bake, then chill and broil with sugar on top. You’ve got this, friend.
A couple notes for the home chef before getting started:
Creme brûlée takes less than an hour to bake, but will need to chill for at least an hour before being brûléed. Ideally, chill for 4 hours prior to serving.
The custard will firm up considerably in the refrigerator, so take it out of the oven when the center is barely set. It should be jiggly but not liquid-y.
Step-by Step: how to make crème brûlée at home
Make the custard filling: The custard filling is a three part process process. First, you’ll gently warm the heavy cream [or coconut milk if you’re going for the dairy-free version] with the split vanilla bean until the mixture starts to steam and bubble around the edges. Set the mixture aside and let it steep while you prepare the rest of the custard. Second, you’ll beat egg yolks and sugar until light in color — about a minute — and whisk in the bourbon. Lastly, you’ll pour about 1/4 of the cream mixture into the eggs + sugar and whisk. Then slowly pour in the rest of the cream mixture, whisking as you pour.
Strain your custard: After you finish the custard filling, strain the mixture through a fine-mesh sieve into a large glass measuring cup with a pour spout. The pour spout will make filling the ramekins much easier!
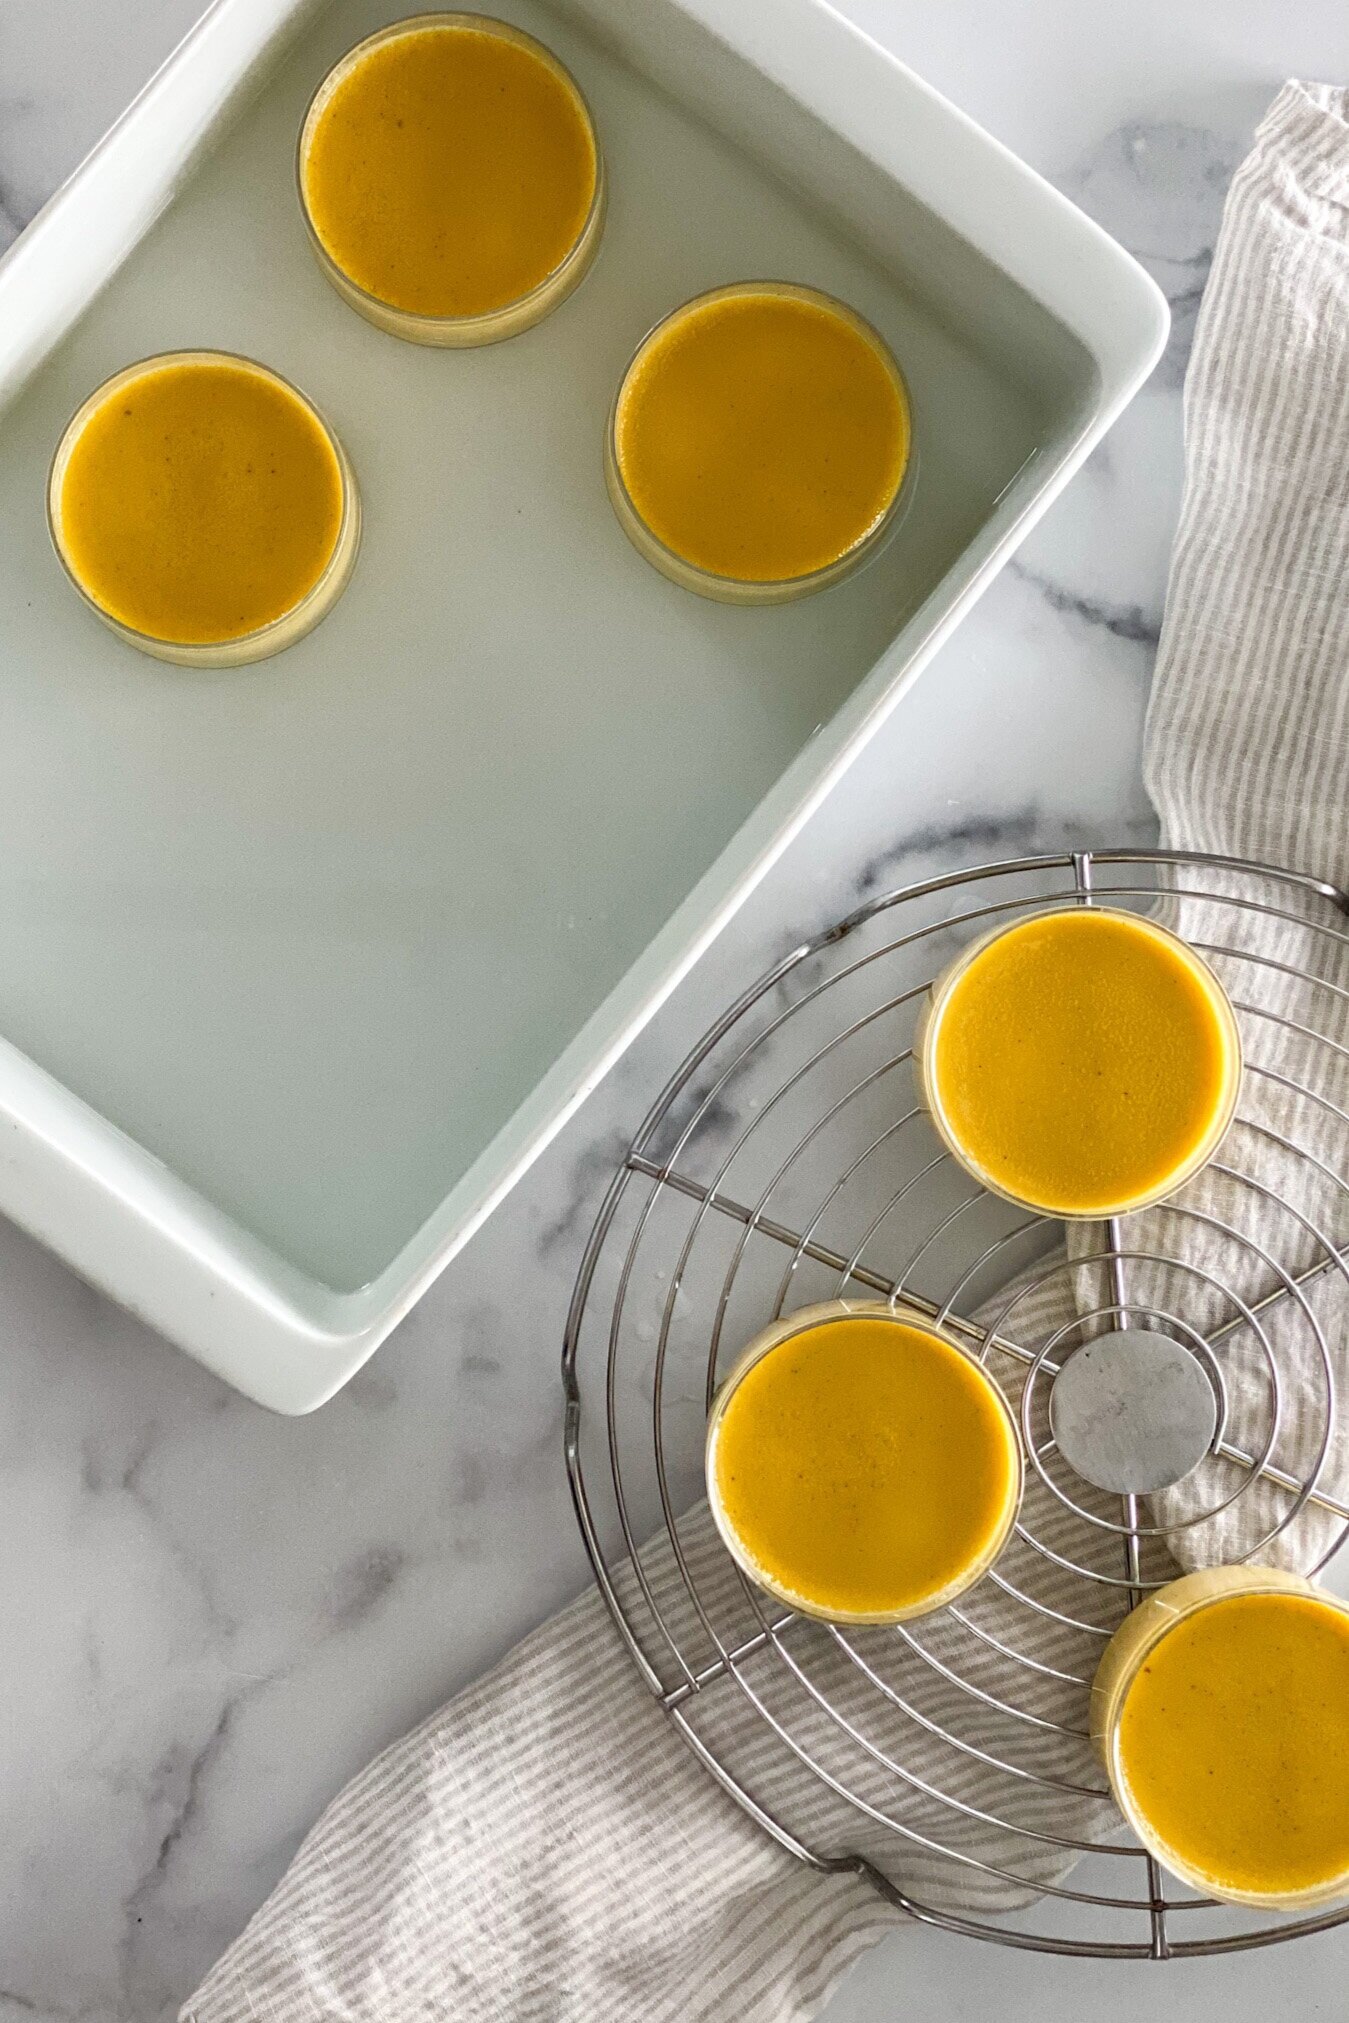
Gently bake the custard in a water bath: Heat a kettle of water while you preheat the oven. Then place the filled ramekins in a baking or roasting pan and fill the pan with the warm water carefully, as not to splash water into the ramekins.
Chill the custard before you brûlée + serve: Once baked, chill the custards for 3-4 hours. The baked and set custard must be chilled before caramelizing the sugar on top to ensure the perfect texture.
Brûléeing + serving: You can definitely use a torch to caramelize the sugar on top of the custard, I picked up this one from my local hardware store, but it’s definitely not needed. If you don’t have use for a torch, the oven broiler does a wonderful job! I recommend putting the ramekins in a cold oven, then turning on the broiler. This helps keep the custard cool while getting the top crisp.

The moral of the story? Don’t shy away from making some gorgeous creme brûlée at home. This Bourbon Vanilla Creme Brûlée is one of my favorite ultra-fancy desserts that always impresses and are so easy to make ahead. Hellooooooo easy entertaining! Plus — whisking egg yolks and sugar, tempering the mixture with warm cream or coconut milk is seriously as romantic as is sounds.
Bourbon Vanilla Crème Brûlée
With only six ingredients and this step-by-step guide, you too can make crème brûlée in your home kitchen — no torch or special equipment required! This Bourbon Vanilla Crème Brûlée is a fun twist on the classic that has just the right balance of boozy and creamy, with that glass-like sugar crust that we all love. And to top it off — this recipe can easily be made dairy-free!
INGREDIENTS:
- 2 cups heavy cream or full fat coconut milk
- 1 vanilla bean, split lengthwise, or 1 teaspoon vanilla extract
- 1/8 teaspoon salt
- 5 egg yolks
- 2 tablespoons bourbon
- 1/2 cup sugar, plus 4 teaspoons for topping
INSTRUCTIONS:
Preheat oven to 325°F. Place four 6-ounce ramekins in a baking dish. In a saucepan, combine cream, vanilla bean, and salt. Cook over medium heat until mixture is bubbling around the edges and steaming. Set aside to steep for a few minutes.
In a medium bowl, beat egg yolks, sugar, until light. Whisk in the bourbon. Discard vanilla bean from cream mixture. Stir about 1/2 cup of the cream into the egg yolk mixture. Gradually whisk in remaining cream.
Strain mixture with a fine mesh sieve into a large measuring cup. Pour custard into ramekins, dividing equally. Fill baking dish with boiling water until it reaches half way up ramekins.
Bake for 30-50 minutes, or until center is barely set. The cook time here will depend on your oven, convection ovens will take less time than a standard oven. Remove ramekins from water and let cool completely on a wire rack. Cover and refrigerate 4 hours.
When ready to serve, top each custard with about a teaspoon of sugar in a thin layer. Caramelize the sugar with a kitchen torch. If you don't have a kitchen torch, you can caramelize the sugar using your oven. Simply place ramekins in a cold oven 2 to 3 inches from heat source and turn on the broiler. Cook until sugar melts and browns or even blackens a bit, about 5 minutes. Allow the creme brûlée to sit for at least 5 minutes before serving. Serve within two hours of brûléeing.
NOTES:
- Make Ahead: You can make and store in the fridge for up to 4 days ahead. At the last minute, just sprinkle the sugar on top and brûlée as directed above!
Don't forget to tag us @thenorthwestkitchen on Instagram when you make this Bourbon Vanilla Crème Brûlée!

Classic Gluten-Free Birthday Cake
This Classic Gluten-Free Birthday Cake is made up of moist and fluffy vanilla-scented yellow cake paired with rich and creamy Chocolate Swiss Meringue Buttercream. And guess what? It’s completely drama-free: no fussy folding needed. Jump to recipe.

I’ve been perfecting this gluten-free yellow cake recipe since I went mostly gluten-free over 7 years ago. At this point, I think I’ve tried every gluten-free yellow cake recipe on the interwebs, visited every gluten-free bakery in the greater Portland area that serves yellow cake [there are a surprising number!], and even sampled some boxed cake mixes.
Why? Because, I am here to continue to prove to you that you don't have to settle for mediocre gluten-free cake.

Everyone needs a kickass yellow cake recipe — especially those of us gluten-free folks who are used to being disappointed with our attempts at homemade cake. Homemade yellow cake is infamous for being overly dense, on the dry side, and a little bit fussy. So many yellow cake recipes call for whipped egg whites and specialty cake flours. Not this one, friends.
This is the best classic birthday cake I’ve ever had, gluten-free or otherwise. This Gluten-Free Birthday Cake has four soft and flavorful vanilla-scented cake layers with an extra moist crumb, slathered in the most luscious chocolate buttercream. And guess what? It’s completely drama-free: no fussy folding [que David Rose impression] or syrup-basting to keep the layers moist [yes, that’s a thing…ewwww David].


I know putting together a layer cake can feel a little daunting, but don't worry friend! This recipe is simple and so very doable.
Some notes for the baker before you get started:
Mise en place — a French term for "everything in its place" — is not just for the pros. As a home cook, mise en place is about having everything you need before you start cooking and it allows you to focus on the task at hand. Take a moment to organize + measure all your ingredients and gather your tools in advance. When it comes to baking + frosting a cake — it’s all about that mise en place.
An offset spatula, parchment paper, and nice serrated knife are well worth the investment.
Chill your cake layers for at least 2 hours before frosting. Do not attempt to spread frosting onto cake layers that are even remotely warm. Without fail, it will make a mess of your cake and leave you frustrated. Better yet, chill your cake layers overnight in the fridge.
If you love baking [or at least, cake-making] like me, consider buying a rotating cake turntable on a pedestal. It’s not essential, but it helps you get that smooth finish quickly and easily. A simple cake carrier will help you transport your cake to the any shindig [I can’t tell you how many times I regretted not having a carrier].

classic gluten free birthday cake
This Classic Gluten-Free Birthday Cake is made up of moist and fluffy vanilla cake paired with rich and creamy Chocolate Swiss Meringue Buttercream.
INGREDIENTS:
For the cake:
- 1 3/4 cups + 2 tablespoons Bob's Redmill Gluten Free 1-to-1 Baking Flour [if using another brand of gf flour see note below]
- 2 3/4 teaspoons baking powder
- 1/2 teaspoon sea salt
- 1 cup granulated sugar
- 3/4 cup avocado oil
- 3 large eggs + 2 yolks, room temperature
- 3/4 cup coconut milk or half & half
- 1 tablespoon vanilla extract
For the swiss meringue buttercream:
- 1/2 cup + 2 tablespoons sugar
- 3 large egg whites
- 6 ounces unsalted butter [room temperature]
- 4 1/2 ounces bittersweet chocolate [melted and cooled]
INSTRUCTIONS:
For the cake layers:
Preheat oven to 350°F (180°C). Position rack in center of oven. For four layers [as pictured], prepare two 6-inch cake pans with avocado oil and line the bottom with a parchment round.
Combine the flour, salt, and baking powder, and salt in a large bowl. Whisk gently to combine.
In a medium bowl, combine sugar and avocado oil. Add eggs and whisk vigourously for about two minutes. Add in coconut milk and vanilla extract and whisk until well combined. Add the egg mixture to the dry ingredients and whisk until smooth.
Divide batter evenly among prepared pans and Bake 25 to 30 minutes, rotating pans if necessary, until a cake tester inserted into the center of each cake comes out clean. Let cool in pans set on a cooling rack for 15 minutes, then turn out onto a rack to finish cooling completely.
- Now it's time to cut the cake layers! Make sure your cakes are completely cooled before starting this step. And since we're working with a 6-inch cake, this is a relatively easy process! Start by lightly pressing the palm of your hand on the top of the cake and use a slow sawing motion, cut halfway up each cake until you slice through the cake [pausing along the way to check that you knife is level]. Gently lift the top layer with the knife and insert a cake circle or large spatula to safely lift off the layer. Repeat this process for the second cake, creating 4 cake layers. If possible, place cake layers in the freezer while you're preparing the buttercream - it makes for much easier assembly!
For the swiss meringue buttercream:
- Whisk sugar and egg whites in a heatproof mixing bowl. Place over a pot of simmering water and whisk constantly until sugar is completely dissolved, 2 to 3 minutes. Test by rubbing some of the egg white mixture between your fingers -- if you don't feel any sugar granules, it's ready! Remove from heat.
- With an electric mixer fitted with the whisk attachment, whisk on high speed until cool [test by touching bottom of bowl], about 7 to 10 minutes.
- Switch to the paddle attachment. With mixer on medium-high speed, add softened butter, 2 tablespoons at a time, until combined.
- Slowly pour in the cooled chocolate and mix until fully combined.
- Frost the [completely cooled] cake layers as your heart desires!
*NOTES:
- If you're using an alternative brand of gluten free flour make sure it contains xanthan gum, if not add 1 tsp xanthan to the recipe
- Chill your cake layers for at least 2 hours at room temperature or 1 hour in the freezer before frosting. Do not attempt to spread frosting onto cake layers that are even remotely warm. Without fail, it will make a mess of your cake and leave you frustrated. Better yet, chill your cake layers overnight in the fridge or even in the freezer.
- Troubleshooting with the buttercream: If the buttercream [or your kitchen] seems too warm, stick the bowl in the fridge for a few minutes, then continue beating. If it's too cold, let the frosting warm up to room temperature, then continue beating until it comes together. This can take several minutes, so don't give up!
Don't forget to tag us @thenorthwestkitchen on Instagram when you make this Classic Gluten-Free Birthday Cake!

Foolproof Gluten-Free Pancakes
These Foolproof Gluten-Free Pancakes are just as fluffy as their gluten containing counterparts. They are simple but decadent, not overly sweet, and perfectly fluffy. These pancakes are thick enough that you could add some fruit or chocolate chips and they will stand up to the challenge. Jump to recipe.

Have you ever noticed that the world at large is in a committed relationship with pancakes?
This phenomenon is something that has honestly baffled me over the years.

Confession time: I’m actually not a big fan of maple syrup and I prefer their sweet, crunchy counterpart — WAFFLES. While pancakes tend to send people into a whirlwind of nostalgia, I only have one very clear + fond memory of pancakes — I ate one pancake slathered in butter and blackberry jam most mornings at my first restaurant job and it just feels like home.
Despite my preferences, I've been trying to recreate that pancake ever since. And to think I’ve found it in a gluten-free version makes me giddy!


In our house, there’s a bit of a difference between weekday and weekend pancakes. Weekday pancakes are mixed with a fork, usually made from nutrient packed ingredients like coconut flour, eggs, and pumpkin puree. But weekend pancakes don’t have to pretend to be superfoods. They are simple but decadent in their own way. Not overly sweet and perfectly fluffy.
These pancakes are thick enough that you could add some fruit or chocolate chips and they will stand up to the challenge.
A few notes for the chef:
use coconut oil or avocado oil for frying these beauties, butter will burn at the heat needed to cook a proper pancake
stick to a 3-4 inch pancake — I use a 1/4 or 1/3 cup measuring cup to measure out the perfect amount of batter
use cast iron if possible - you’ll get a perfectly crispy edge and fluffy interior. For a large cast-iron skillet or griddle, heat it on low for a few minutes to get the heat evenly distributed. Just before ladling in your batter, turn it up to medium–low.
your first pancake probably won’t turn out quite right as it takes a bit of adjustment to get the right cooking temp & timing the flip. Just think of that first pancake as your reward for being the cook.
the most challenging part of making pancakes, of course, is keeping them warm while assembling breakfast for the whole family. My trick — heat the oven to 325 degrees, and store the pancakes there on a wire rack-lined baking tray until all the pancakes are made.
are you a sourdough geek like me? add about 200g of discard starter to the final batter for this recipe — it adds to the fluffy goodness and increases the depth of flavor.

foolproof gluten-free pancakes
These Foolproof Gluten-Free Pancakes are just as fluffy as their gluten containing counterparts. They are simple but decadent, not overly sweet, and perfectly fluffy. These pancakes are thick enough that you could add some fruit or chocolate chips and they will stand up to the challenge.
INGREDIENTS:
- 1 1/3 cups Bob's Redmill Gluten Free 1-to-1 Baking Flour [if using another brand of gf flour see note below]
- 1 teaspoon baking powder
- 1/2 teaspoon baking soda
- 1/2 teaspoon sea salt
- 2 eggs, lightly beaten
- 1 teaspoon vanilla extract
- 1/2-1 cup buttermilk OR non-dairy milk + 1-2 teaspoons white vinegar [start with 1/2 cup add more as needed]
- 2 tablespoons avocado oil
INSTRUCTIONS:
- Begin preheating a cast iron pan to low heat.
- Combine the flour, baking powder, baking soda and salt in a medium bowl.
- In a separate bowl, whisk together the eggs, 1/2 cup buttermilk [or non-dairy milk + vinegar] and oil.
- With a wire whisk, stir wet ingredients into dry ingredients until smooth. Add more buttermilk or non-dairy milk as needed.
- Let the batter rest for a 5 minutes.
- Just before ladling in your batter, turn it up to medium–low.
- Ladle approximately ⅓ cup pancake batter onto cast iron. Flip when bubbly and edges are slightly dry, about 3 - 4 minutes per side. Serve hot with your desired toppings.
*NOTES:
- if you're using an alternative brand of gluten free flour make sure it contains xanthan gum, if not add 1 tsp xanthan to the recipe
Don't forget to tag us @thenorthwestkitchen on Instagram when you make these Foolproof Gluten Free Pancakes!

Fudgy Gluten Free Chocolate Cake with Chocolate Swiss Meringue Buttercream
This Fudgy Gluten Free Chocolate Cake isn't nearly as fussy to make as you might think. Decadent chocolate cake is layered with Chocolate Swiss Meringue Buttercream — the result is a moist cake that keeps well without refrigeration and tastes gorgeous! Jump to recipe.

Listen up friends — I am here to tell you that you don't have to settle for mediocre gluten-free cake.
Here's the real real: I understand that pretty much every blogger out there with a chocolate cake recipe says that theirs is the best ever, and you know what -- they probably believe it to be true. But I'm just arrogant enough to tell you they're wrong.
This is it. THIS is the most delicious, fudgy, moist, gluten-free chocolate cake out there.

Anyone else in a LOVE-LOVE relationship with cake? I like mine full of flavor and definitely not overly sweet!
My love affair with cake started early. Growing up my mom would make elaborate cakes for my brother and I on our birthdays. In fact, the night before my 3rd birthday party I got caught sitting on the kitchen counter nearly diving head first into my birthday cake -- hands and face covered in frosting. My mom recalls snapping a few photos before bursting out laughing and saying aloud, "I can't blame you!" I'd like to think I would have the same sense of humor for my kiddo after putting in all that hard work.
Over the years, my love for cake has only grown stronger. While others may have stories of growing up in the kitchen at their mom's hip, learning how to bake cakes & cookies -- that was a rare occurrence in my home.
Although my mom was [and still is] a very talented baker, she spent most of my childhood working 2-3 jobs to support our family, which didn't leave much time for baking. Plus, I was preoccupied with ballet and getting perfect grades so I could get out of our tiny town one day.
What I did pick up from my sweet mama: independence and a kick-ass work ethic, which landed me my first restaurant job at the age of 14 in a cute little bakery & cafe. By 15, I was making croissants, baking cakes, and playing barista. I spent my weekends and summers there throughout high school and fell in love with the process.


I know putting together a layer cake can feel a little daunting, but don't worry friend! This recipe is simple and so very doable.
Some notes for the baker before you get started:
Mise en place — a French term for "everything in its place" — is not just for the pros. As a home cook, mise en place is about having everything you need before you start cooking and it allows you to focus on the task at hand. Take a moment to organize + measure all your ingredients and gather your tools in advance. When it comes to baking + frosting a cake — it’s all about that mise en place.
An offset spatula, parchment paper, and nice serrated knife are well worth the investment.
Chill your cake layers for at least 2 hours before frosting. Do not attempt to spread frosting onto cake layers that are even remotely warm. Without fail, it will make a mess of your cake and leave you frustrated. Better yet, chill your cake layers overnight in the fridge.
If you love baking [or at least, cake-making] like me, consider buying a rotating cake turntable on a pedestal. It’s not essential, but it helps you get that smooth finish quickly and easily. A simple cake carrier will help you transport your cake to the any shindig [I can’t tell you how many times I regretted not having a carrier].
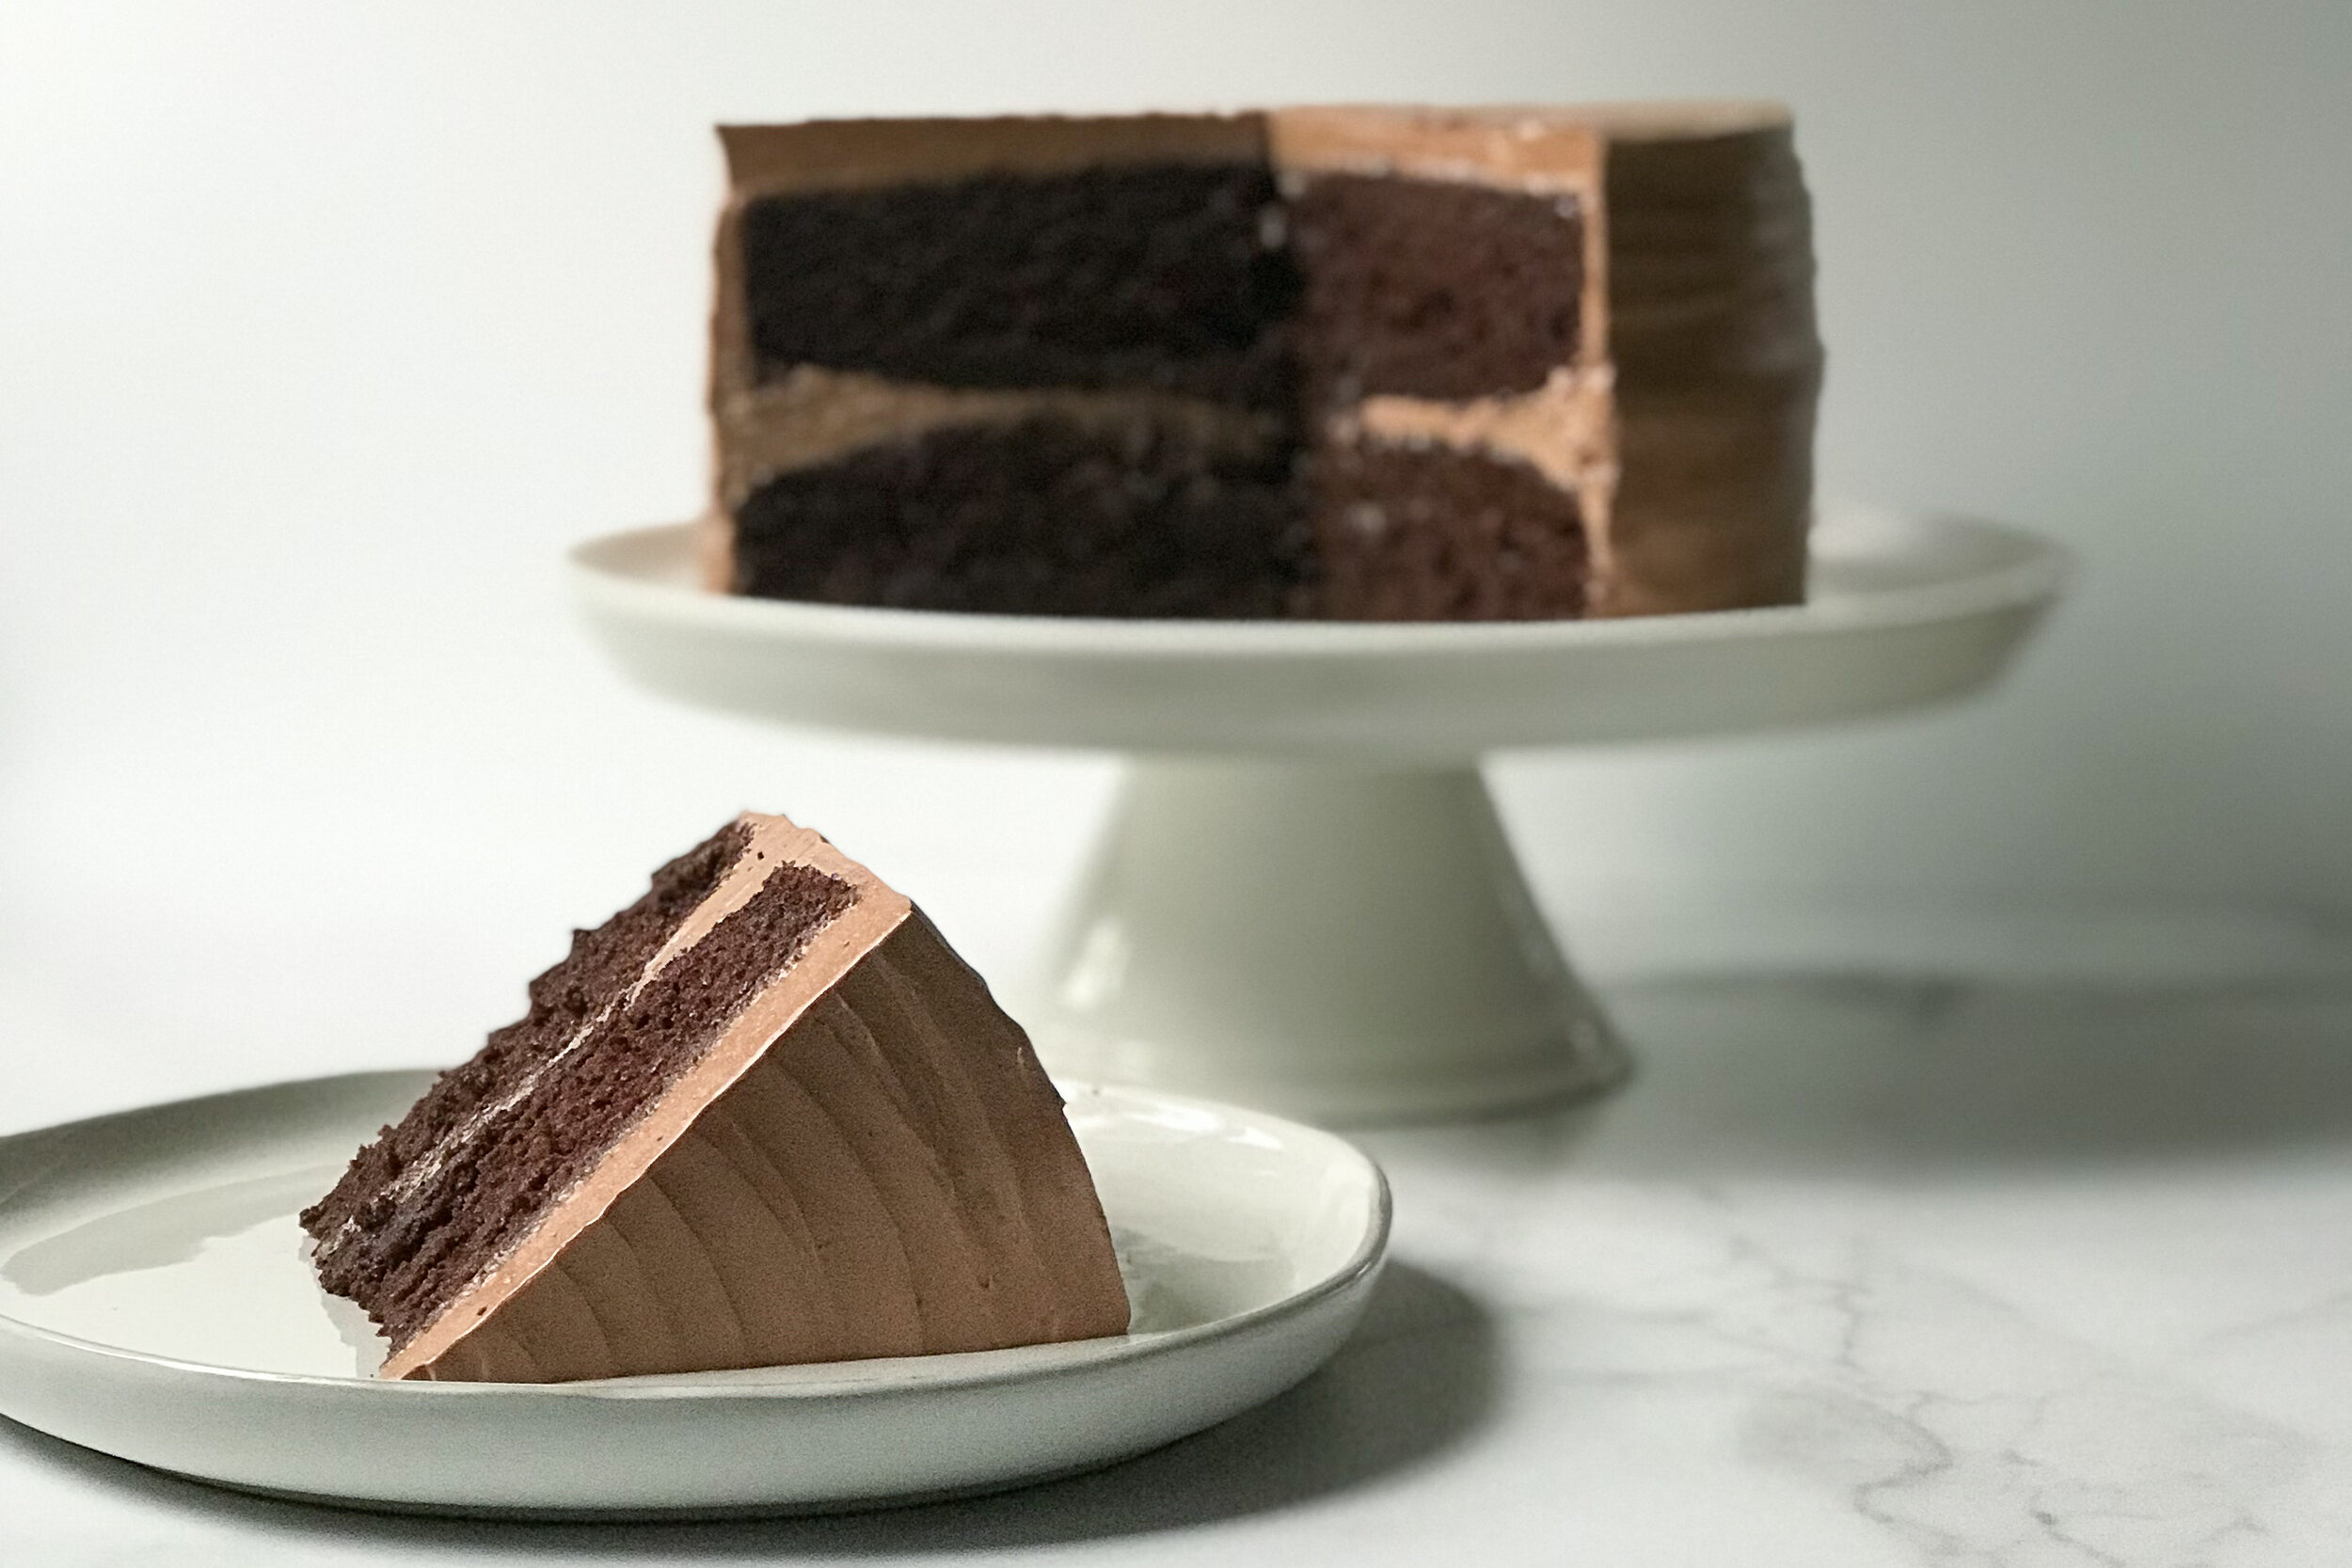
fudgy gluten free chocolate cake with chocolate swiss meringue buttercream
This Fudgy Gluten Free Chocolate Cake isn't nearly as fussy to make as you might think. Decadent chocolate cake is layered with Chocolate Swiss Meringue Buttercream — the result is a moist cake that keeps well without refrigeration and tastes gorgeous!
INGREDIENTS:
For the cake:
- 1¾ cups Bob's Redmill Gluten Free 1-to-1 Baking Flour [if using another brand of gf flour see note below]
- 1¾ cups sugar
- 1 cup cacao powder
- 1 teaspoons baking soda
- 1 teaspoons baking powder
- 1 teaspoon sea salt
- 3 eggs, room temperature
- ½ cup avocado oil
- 1 tablespoon vanilla extract
- 1 cup full-fat coconut milk [we like Aroy-D or Thai Kitchen]
- 1 cup [strong] hot coffee
For the swiss meringue buttercream:
- 1 1/4 cups sugar
- 5 large egg whites
- 3 sticks unsalted butter [room temperature]
- 9 ounces bittersweet chocolate [melted and cooled]
INSTRUCTIONS:
For the cake layers:
- Heat the oven to 350 degrees. Prepare two 8-inch cake pans with avocado oil and line the bottom with a parchment round.
- Combine the sugar, flour, cacao, baking powder, baking soda, and salt in a large bowl. Whisk gently to combine.
- Whisk together, eggs, oil, vanilla and coconut milk until well combined. Add the egg mixture to the dry ingredients and whisk until smooth.
- Carefully whisk in the hot coffee. Note: the batter will be runny -- not to worry, it bakes up beautifully!
- Divide batter evenly among prepared pans and Bake 30 to 35 minutes, rotating pans if necessary, until a cake tester inserted into the center of each cake comes out clean. Let cool in pans set on a cooling rack for 15 minutes, then turn out onto a rack to finish cooling completely.
For the swiss meringue buttercream:
- Whisk sugar and egg whites in a heatproof mixing bowl. Place over a pot of simmering water and whisk constantly until sugar is completely dissolved, 2 to 3 minutes. Test by rubbing some of the egg white mixture between your fingers -- if you don't feel any sugar granules, it's ready! Remove from heat.
- With an electric mixer fitted with the whisk attachment, whisk on high speed until cool [test by touching bottom of bowl], 7 to 10 minutes.
- Switch to the paddle attachment. With mixer on medium-high speed, add softened butter, 2 tablespoons at a time, until combined.
- Slowly pour in the cooled chocolate and mix until fully combined.
- Frost the [completely cooled] cake layers as your heart desires!
*NOTES:
- if you're using an alternative brand of gluten free flour make sure it contains xanthan gum, if not add 1 tsp xanthan to the recipe
- Chill your cake layers for at least 2 hours before frosting. Do not attempt to spread frosting onto cake layers that are even remotely warm. Without fail, it will make a mess of your cake and leave you frustrated. Better yet, chill your cake layers overnight in the fridge.
- Troubleshooting with the buttercream: If the buttercream [or your kitchen] seems too warm, stick the bowl in the fridge for a few minutes, then continue beating. If it's too cold, let the frosting warm up to room temperature, then continue beating until it comes together. This can take several minutes, so don't give up!
Don't forget to tag us @thenorthwestkitchen on Instagram when you make this Fudgy Gluten-Free Chocolate Cake!

Chocolate Orange Pots de Crème
These Chocolate Orange Pots de Crème are one of my favorite ultra-fancy desserts that always impress a crowd and are so easy to make ahead. Don’t shy away from this gem! It’s simple -- just don’t rush the process. Jump to recipe.

When I put out my first dessert menu as a pastry chef -- these little beauties were the first thing I dreamed up and from that day forward -- I wasn't allowed to take them off the menu without a detailed explanation of why and an exact date when they'd return to all of our patrons.
The idea came to me one day when I was reminiscing over noshing on Terry's Chocolate Oranges during the holidays with my family over the years. They are a delicious combination of chocolate with a hint of orange oil and as if they couldn’t get any better, they came in “segments”, shaped just like a real orange [which for 7-year-old Cassie was the stuff of dreams]. The tradition in our family was to open one on Christmas Eve -- my brother would always volunteer to hit the top and the chocolate orange ball would fall into sections for all of us to enjoy.

Chocolate + Orange have a special place in my heart. It feels like Christmas. Like family. ⠀
This recipe is for my SERIOUS chocolate-lovers. Chocolate Pot de Crème is super-rich, decadent French take on chocolate pudding that will make you feel like a culinary boss at any holiday gathering. This dairy-free version is a mix of full-fat coconut milk, bittersweet chocolate, egg yolks that is scented with orange. Make sure to finish these with some fresh whipped cream, whipped coconut cream, or my favorite -- Coyo Coconut Yogurt.
⠀⠀⠀⠀⠀⠀⠀⠀⠀
Don’t shy away from this gem. It’s simple -- just don’t rush the process. In fact, pots de creme is one of my favorite ultra-fancy desserts that always impress a crowd and are so easy to make ahead. Hellooooooo easy entertaining! Plus — whisking egg yolks and sugar, tempering the mixture with warm coconut milk and chocolate is seriously as romantic as is sounds.

chocolate orange pots de crème
These Chocolate Orange Pots de Crème are one of my favorite ultra-fancy desserts that always impress a crowd and are so easy to make ahead. Don’t shy away from this gem! It’s simple -- just don’t rush the process.
Here’s what you’ll need to make four 4-ounce servings:
INGREDIENTS:
For the pots de crème:
- 9 ounces dark chocolate [at least 70% cacao], finely chopped
- 1 [14-ounces] full-fat coconut milk
- 2 large egg yolks
- ⅛ teaspoon vanila bean paste (about 1/2-1 vanilla bean)
- ⅛ teaspoon kosher salt
- 1 teaspoon gran marnier
- 1 teaspoon finely grated orange peel
- 1 tablespoon maple syrup
For the candied orange peel:
- 1 orange
- 1 cup sugar, divided
- ¾ cup water
For the whipped topping:
- 1 [14-ounce] can full-fat coconut milk, chilled overnight in the refrigerator
- organic sugar, to taste [optional]
INSTRUCTIONS:
For the pots de creme:
- Place the chocolate in a medium bowl and set aside.
- In a medium saucepan, add the can of coconut milk, egg yolks, vanilla bean paste, kosher salt, Gran Marnier, grated orange peel and maple syrup. Whisk until thoroughly combined.
- Heat the mixture over medium-low heat, stirring continually until it thickens and forms a smooth custard that coats the back of a wooden spoon (about 10 to 15 minutes).
- Watch the custard very closely to avoid overcooking it. You want the custard to steam but don't allow it to simmer or boil. Remember: Steaming is good, but simmering and boiling are bad. The custard should be about 175°F [80°C] when it's ready [you don't have to use a thermometer here but it can't hurt!].
- When the custard is ready, take the pot off the heat. Position a fine mesh sieve over the bowl of chocolate, and pour the custard through to catch the orange peel and any lumps that may have formed.
- Let the chocolate and custard mixture sit for 5-6 minutes so the warm custard has time to melt the chocolate completely.
- Gently fold the melted chocolate into the custard base [if you stir too quickly, the chocolate can get grainy].
- Once the mixture is fully combined and smooth, divide evenly into four 4-ounce coffee cups or ramekins and cool to room temperature.
- Cover the cups with foil and chill in fridge for at least 4 hours.
For the candied orange peel:
- Using a vegetable peeler, remove the orange part of peel [avoiding the white pith] from the orange in long strips. Cut the pieces lengthwise into 1/8-inch-wide strips.
- Combine 3/4 cup sugar and 3/4 cup water in a small, heavy saucepan over medium-low heat and stir until sugar dissolves.
- Bring to a boil. Reduce heat and simmer 2 minutes. Add orange peel and simmer for 15 minutes.
- Place remaining 1/4 cup sugar in a small bowl. Using a slotted spoon, remove orange peel strips from the syrup and transfer to the bowl of sugar. Toss to coat. Cool, tossing occasionally. Cover bowl [let the orange peel hang out in the bowl of sugar] and let stand at room temperature overnight. Can be made 2 days ahead -- just make sure to keep them covered!
For the whipped coconut cream:
- When you’re ready to serve, remove the chilled can of coconut milk from the fridge.
- Carefully spoon out the thick layer of solidified coconut cream on the top, avoiding the watery part at the bottom of the can.
- Toss the coconut cream and sugar into a chilled bowl and mix using a hand mixer until fluffy.
- For serving, spoon a generous amount of the whipped coconut cream onto each cup – or if you’re feeling adventurous, some Coyo Coconut Yogurt.
- Top with candied orange peel and wow everyone with your fancy dessert skills!
NOTES:
- This recipes works beautifully every single time -- as long as you don't rush the process! Be patient through each step and you're there!
- If you prefer to stretch this into smaller portions [it's seriously rich so it will definitely work to do so!] you can divide the chocoalte custard among eight 2-ounce ramekins or espresso cups.
- If you tolerate dairy just fine you can replace the whipped coconut cream with fresh whipped cream.
Don't forget to tag us @thenorthwestkitchen on Instagram when you make these Chocolate Orange Pots de Crème!
The North + West Kitchen & Cassie Kanable, LLC partner with affiliate platforms including Amazon Services LLC Associates Program where commission may be earned based on clicks and/or purchases, and I would love it if you decided to use the links above! This means if you make a purchase using the links here on the blog – your cost remains the same, but I earn a small percentage to help support this blog. Thank you! Affiliate links help educators like me to fund the free content that we provide.