Gluten-Free Carrot Cake with Brown Sugar Buttercream + Goat Cheese Filling
This Gluten-Free Carrot Cake is the perfect dessert for spring! Flavorful + moist carrot cake is studded with chopped walnuts, pineapple, and shredded coconut, filled with a tangy goat cheese filling and slathered in airy brown sugar buttercream [don’t worry — if you’re a cream cheese frosting purist, we’ve got you covered!] Jump to recipe.
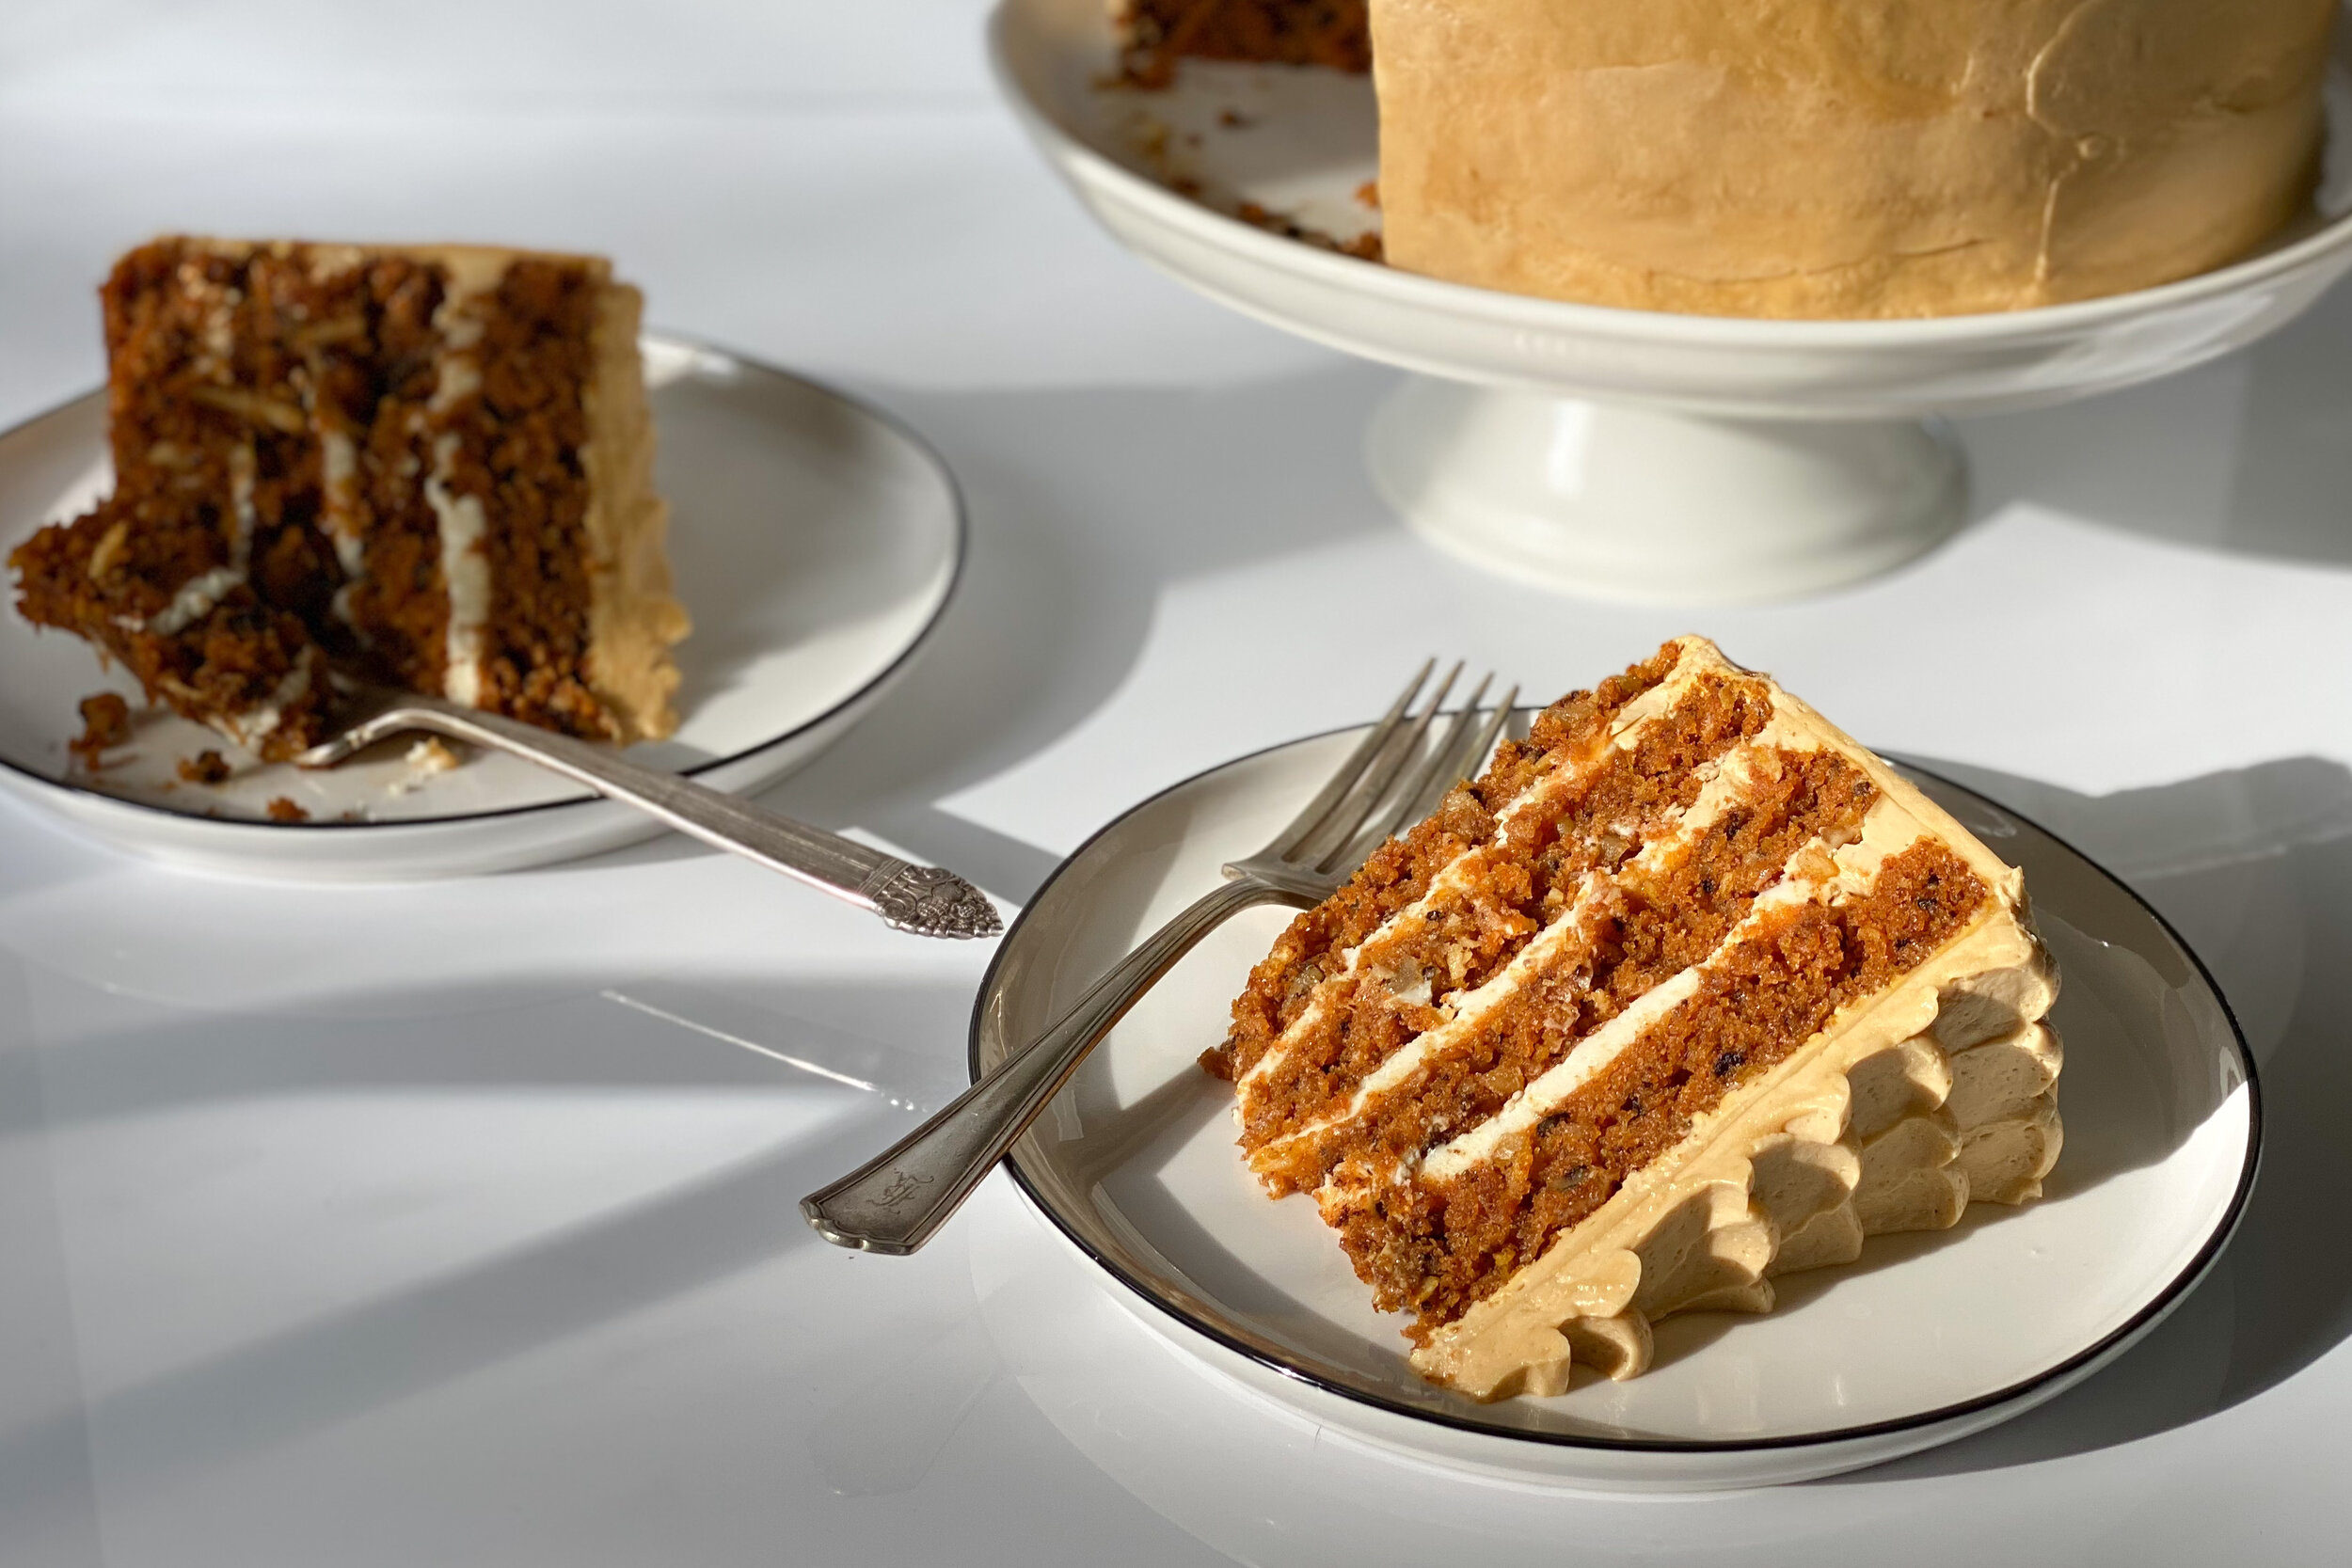
This cake is incredibly easy to throw together in one bowl and is made with olive oil rather than butter, which makes it bake up loftier with a more even crumb and stay moist far longer than cakes made with butter. It’s also loaded pureed carrot [not grated!], crushed pineapple, and chopped walnuts, which give it tons of flavor and texture.
And listen, I know my cream cheese frosting purists out there are probably balking at the brown sugar buttercream and goat cheese filling in lieu of the traditional cream cheese frosting, just hear me out: the tanginess from the goat cheese and the airy + slightly sweet brown sugar buttercream make this cake a masterpiece. I developed this recipe for those who can’t really handle cow-dairy without consequences — and the chèvre makes for the perfect tangy substitute for cream cheese.
Still prefer cream cheese frosting? I’ve got you covered. Read on to the recipe below and make up the cream cheese frosting + filling for the classic take on my gluten-free carrot cake.
The best part about taking this cake to any celebration? No one will even notice it’s gluten-free. I serve this cake at Easter each year [it’s required at this point] but this cake can most definitely be served year-round.


BEHIND THE RECIPE
I know every baker under the sun says their carrot cake is the best, so I won’t quite say it, but I will for damn sure be putting my hat in the ring. I originally developed this recipe for my first spring menu at my first pastry chef gig. I remember my boss saying that there was no way carrot cake would sell year-round, so in true Enneagram 8 form, I thought, “challenge accepted.” Once it debuted on the menu, word got out and every review mentioned how incredibly moist + flavorful this cake was without being overly sweet. Isn’t that what everyone wants in a cake? I knew then that I was on to something.
Then the phone started ringing — customers called in asking if we would sell them whole carrot cakes for an upcoming baby shower or birthday. We had coffee shops asking if they could purchase the cake wholesale and serve it by the slice in their pastry case. It became our best-selling dessert and it was, in fact, our best seller year-round. Take that, boss man.
Fast forward many years later and I’ve since adapted that initial recipe to be gluten-free without a single soul knowing it until now. Is it just me or do my fellow gluten-free bakers out there love bringing a dessert to a gathering and watching the shock on people’s faces when they’re told it’s gluten-free? That’s my M.O.


THE SECRET INGREDIENT: PURÉED CARROT
Cooked, puréed carrots are one of the key ingredients that make this cake crazy flavorful and perfectly moist for days. I’m also not a fan of grating anything, so if I can avoid that I’m on board. To save yourself a little time, cook the puréed carrot in advance or better yet, throw them in the Instant Pot:
Carrot purée stovetop method: Simmer 1 pound 4 ounces chopped carrots in a 1- to 2-quart heavy saucepan filled with water, covered, until carrots are very tender, 12 to 14 minutes. Purée carrots in a food processor until smooth.
Carrot purée Instant Pot method: Place a steamer basket in the bottom of the insert and add 1 cup water. Place 1 pound 4 ounces chopped carrots inside the basket and lock the lid in place. Select High Pressure and 4 minutes cook time. Let the pressure release naturally for 10 minutes, then finish with a quick pressure release. Purée carrots in a food processor until smooth.
SOME NOTES FOR THE BAKER BEFORE GETTING STARTED
I know putting together a layer cake can feel a little daunting, but don't worry friend, I got you!
Mise en place — a French term for "everything in its place" — is not just for the pros. As a home cook, mise en place is about having everything you need before you start cooking and it allows you to focus on the task at hand. Take a moment to organize + measure all your ingredients and gather your tools in advance. When it comes to baking + frosting a cake — it’s all about that mise en place.
An offset spatula, parchment paper, and nice serrated knife are well worth the investment.
Chill your cake layers for at least 2 hours before frosting. Do not attempt to spread frosting onto cake layers that are even remotely warm. Without fail, it will make a mess of your cake and leave you frustrated. Better yet, chill your cake layers overnight in the fridge.
If you love baking [or at least, cake-making] like me, consider buying a rotating cake turntable on a pedestal. It’s not essential, but it helps you get that smooth finish quickly and easily. A simple cake carrier will help you transport your cake to the any shindig [I can’t tell you how many times I regretted not having a carrier].
IF YOU PREFER CREAM CHEESE FROSTING:
Instead of preparing the brown sugar buttercream and goat cheese filling, follow these simple steps to make a batch of classic cream cheese frosting:
In a large bowl, cream together 16 ounces softened cream cheese, 6 ounces [1.5 sticks] softened butter, and 2 teaspoons vanilla extract using a hand-mixer on high until well combined, about 2-3 minutes. Add 1 to 1 1/2 cups granulated sugar and continue to mix on high until smooth, about 2-3 minutes. [if you prefer your cream cheese frosting to be a bit sweeter, add a bit more granulated sugar to taste. [we like it tangy!]. Once cake layers have cooled, fill and frost as desired!

Gluten-Free Carrot Cake with Brown Sugar Buttercream and Goat Cheese Filling
This Gluten-Free Carrot Cake is the perfect dessert for spring! Flavorful + moist carrot cake is studded with chopped walnuts, pineapple, and shredded coconut, filled with a tangle goat cheese filling and slathered in airy brown sugar buttercream.
INGREDIENTS:
For the carrot cake:
- 3 cups Bob's Redmill Gluten Free 1-to-1 Baking Flour (if using another brand of gf flour, see note below)
- 2 1/2 cups granulated sugar
- 1 teaspoon sea salt
- 1 tablespoon baking soda
- 1 tablespoon ground cinnamon
- 1 1/2 cups olive oil
- 4 large eggs, lightly beaten
- 1 tablespoon vanilla extract
- 1 1/2 cups walnuts, finely chopped
- 1 1/4 cup shredded unsweetened coconut
- 1 1/2 cups pureed cooked carrots (about 1lb 4oz raw carrots)
- 8 oz. can crushed pineapple, drained
For the goat cheese filling:
- 12 oz chèvre (soft goat cheese), room temperature
- 6 tablespoons unsalted butter, room temperature
- 1 teaspoon vanilla extract
- 1 cup granulated sugar
For the brown sugar swiss meringue buttercream:
- 1 2/3 cups light brown sugar
- 1/4 tsp kosher salt
- 6 large egg whites
- 16 ounces unsalted butter, room temperature
INSTRUCTIONS:
For the cake layers:
Preheat oven to 350°F (180°C). Position rack in center of oven. If you're opting for four layers (as pictured), you'll need four 9-inch pans or make two layers at a time. For two layers, you'll need two 9-inch cake pans. Prepare cake pans with avocado oil and line the bottom with a parchment round.
Peel and cook carrots until a fork tender (see Instant Pot or stovetop method above). 1lb 4oz raw carrots should yield about the right amount of puréed, cooked carrots. Drain the carrots and purree while still warm in a blender or food processor until they are smooth. Measure out 1 1/2 cups of the carrot purée and set aside.
In a large bowl, combine flour, sugar, baking soda, salt, and cinnamon. Whisk gently to combine.
Add olive oil, eggs, and vanilla and whisk well to combine. Fold in the coconut, walnuts, crushed pineapple, and warm carrot purée.
Divide batter evenly among prepared pans and Bake 25 to 30 minutes if you're making a 4-layer cake (45-50 minutes if you're making a 2-layer cake) rotating pans if necessary, until a toothpick inserted into the center of each cake comes out clean. Let cool in pans set on a cooling rack for 15 minutes, then turn out onto a rack to finish cooling completely.
For the goat cheese filling:
In a large bowl, cream together softened goat cheese and butter using a hand-mixer on high until well combined, about 2-3 minutes.
Add granulated sugar and continue to mix on high until smooth, about 2-3 minutes.
For the swiss meringue buttercream:
- Whisk brown sugar, egg whites, and salt in the heatproof mixing bowl of your stand mixer. Place over a pot of simmering water and whisk constantly until sugar is completely dissolved, 2 to 3 minutes. Test by rubbing some of the egg white mixture between your fingers -- if you don't feel any sugar granules, it's ready! Remove from heat.
- With an electric stand mixer fitted with the whisk attachment, whisk on high speed until cool (test by touching the bottom of the bowl), about 7 to 10 minutes.
- Switch to the paddle attachment. With mixer on medium-high speed, add softened butter, 2 tablespoons at a time, until combined.
Assembly:
- Place one layer of cake on a cake stand or serving plate with cardboard cake round (make sure cake layers are completely cooled).
- Pipe a 1 inch border of buttercream around the outside to hold the goat cheese filling in. Fill with about 1/3 of the goat cheese filling. Repeat with each layer until you reach the final layer.
- Place final layer on top and do a thin crumb coat on the cake. Chill for 20mins.
- Frost the top and sides of the cake. Smooth with a large offset spatula or icing scraper.
- Optional: Pipe a petal pattern over the top using a 1A piping tip with remainder of frosting. Starting from the top, outside edge of the cake, pipe a border of single dots, about 1/2-inch or so, of the brown sugar buttercream. Use a small offset spatula to press and pull the dot towards the center of the cake (scraping excess buttercream off the spatula as you go). To start a new row, pipe the next dot overlapping the previous pulled dot. This motion is what creates a petal effect. Repeat the process until you have reach the center of the cake.
*NOTES:
- If you're using an alternative brand of gluten free flour, make sure it contains xanthan gum. If not, add 1 tsp xanthan to the recipe
- Chill your cake layers for at least 2 hours at room temperature or 1 hour in the freezer before frosting. Do not attempt to spread frosting onto cake layers that are even remotely warm. Without fail, it will make a mess of your cake and leave you frustrated. Better yet, chill your cake layers overnight in the fridge or even in the freezer.
- Troubleshooting with the buttercream: If the buttercream (or your kitchen) seems too warm, stick the bowl in the fridge for a few minutes, then continue beating. If it's too cold, let the frosting warm up to room temperature, then continue beating until it comes together. This can take several minutes, so don't give up!
Don't forget to tag us @thenorthwestkitchen on Instagram when you make this Gluten-Free Carrot Cake!